• As Life Would Have It

Jean's Blog of Life, Farms and Everything

~ Welcome to life on our mini-farm in the AriDzona desert!

Jean's Blog of Life, Farms and Everything

Tag Archives: DIY

January Cure 2016- The Big Office Project part 2 and closet

12 Tuesday Jan 2016

Posted by Jean in Home and other Repairs, Home Decor, January Cure 2016

≈ Leave a comment

Tags

DIY, do it yourself, home decor, home furniture, home organization, January Cure, January Cure 2016, wood craft, wood furniture

At first I was disappointed that there was a 30 minute time limit this year on the closet project. I was extremely grateful for the full closet clear out last year and that is one of the many assignments that worked perfectly without me having to give it any thought at all during the year. I find that the only things that did not work well, were things I had a limited amount of time to do last year.  Thus, I decided right from the start today that I would ignore the 30 minute time limit and get my hall closet completely cleared, cleaned and organized so that I could use a shelf for office supplies. Things didn’t go as planned.

The company that installed that new AC unit I had to spend nearly half my meager savings on last summer had made an appointment to come by as part of their routine maintenance agreement. Once he had checked out the unit, he came inside and showed me pictures of just how caked with dust my brand new AC has become. Since it is sealed from the blowing desert dust, the filth can only be coming from the ducts. Cleaning the unit is part of the maintenance agreement so that won’t cost me anything. However, to prevent the unit from clogging up again within the next 6 months my ducts have to be cleaned. There may be a few tear stains on that 600.00 check I had to write.

Anyway, so the guy is sending a team out tomorrow. This meant my closet project was immediately put on hold. I had to finish clearing and sorting the office so that workers can get in and out of there. I also have to deal with the lump of laundry on my bed immediately and not put that off while I work on other projects. Cleaning off my night stands was on my list of small projects but I now have to do that tonight so they can be moved out of the way so that the ginormous king sized bed can be moved over so the workers can access the vent.

Not a damned thing “routine” about AC maintenance. It’s forcing the bedroom, office, laundry lump and nightstand projects to be scrunched up into a 24 hour period. No flowers, just a “bend over”.

I did get to spend 30 minutes in a closet today. Just not the one I wanted. I needed to clear a shelf in the office closet for craft supplies to get them off the floor so that workers can move around in that room. I added more things to the garbage pile and more things to the outbox/swap meet box while making that space.

Thankfully, tomorrow is “work on your project” day so once the AC crew leaves (hopefully by noon), I’ll be able to get to that closet, create a space for office supplies, which will in turn allow me to clear a space for guests to place their clothes.

officecleared

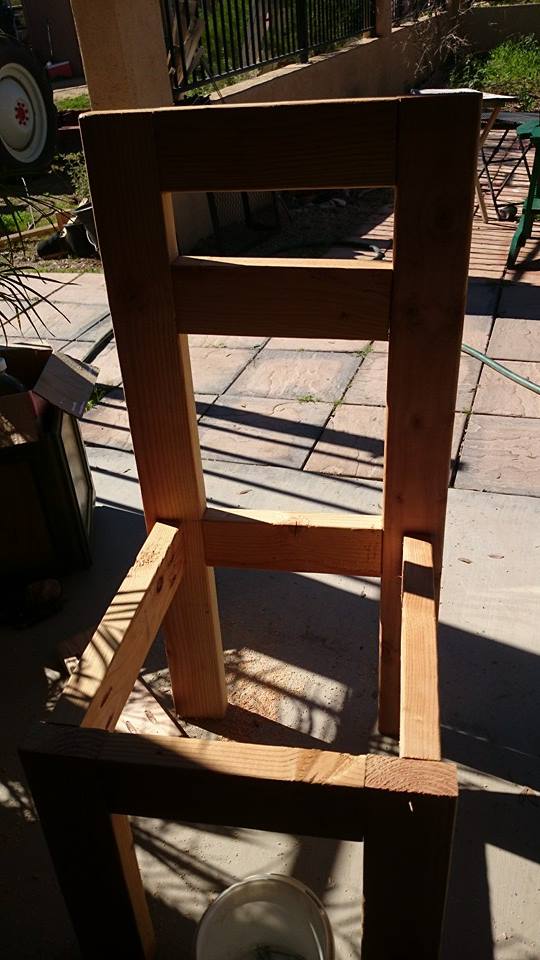
The office is now cleared of extraneous “stuff”.  That pile on the floor is the “outbox”. Next step is to box my toys and the computer stuff temporarily, so the furniture can be removed and the new furniture built.

Share this:

  • Click to share on X (Opens in new window) X
  • Click to share on Facebook (Opens in new window) Facebook
Like Loading...

DIY Cabinet Door Chalkboard Success!

15 Sunday Feb 2015

Posted by Jean in Home Decor

≈ Leave a comment

Tags

cabinet doors, DIY, do it yourself, home decor, homemade furniture, upcyle cabinet door, wood craft, wood crafts

chalkboardworksIt’s very easy to draw and write on and the chalk comes off with a very slightly dampened microfiber cloth! I love simple successes, even though my mishaps make better stories later.

Here’s a link to the original post.

https://azprancingponyfarm.com/2015/02/08/make-a-chalkboard-out-of-a-used-cabinet-door/

Share this:

  • Click to share on X (Opens in new window) X
  • Click to share on Facebook (Opens in new window) Facebook
Like Loading...

Front Porch Chair

09 Monday Feb 2015

Posted by Jean in Home Decor, Wood Crafts

≈ 1 Comment

Tags

DIY, diy chair, do it yourself, home decor, homemade furniture, outoor furniture, wood craft, wood furniture, wooden chair

I finally got out of the house today. I’ve been trying to get the house fully in order where it can pretty much stay fully in order. This, however, is a long process and is about dull as dishwater. I’ve been itching to get outside and build something, ANYTHING.

A couple of months ago I decided that the front porch needed a table and a couple of chairs. The big back patio faces west and is just too hot to enjoy for about 5 months out of the year. Once the sun moves over the house, the back patio starts heating up and I could bake stuff out there by 3:00pm. Gosh knows John and I have baked ourselves pretty thoroughly out there trying to get projects done last summer. Thus, the front porch will be our go to spot for bbqs and such. I can even clean up the old grill and put it out there. Add a few plants and make it a spot I’ll actually remember to use. I’m pretty sure the front yard landscaping would appreciate it if I remembered it more often.

I had John cut the wood for the chairs back when I thought of this project, but then got side tracked by an intense month of house keeping and organizing. The past two days have been so beautiful that I just could not stand to work in the house again today. I needed sun, blue sky and creativity before I went berserk.

Here are the cut pieces of 2×4 for two chairs. Right where they’ve been sitting for over a month.

woodcutsYup, the cute work table we used all last summer before we finally painted it and made it a part of our patio decor is being pressed into service as a work table again.

I pre-drilled pocket holes in the chair back boards, front apron, side boards and support board. While doing this I had the first inkling of problems caused by not getting around to doing this for over a month. The wood was damp and devilishly difficult to drill because the bit kept getting clogged. I finally got it done though and began putting the chair together.

This is where I noticed problem number 2. I had disregarded my rule of using lumber within a day or two of purchase. No matter how straight a construction grade 2×4 is when you buy it, it can warp, bow and twist while waiting to be used. I had actually thought of this and had John go ahead and cut the pieces the day after we brought them home. Then I put off building the chairs, thinking the cut pieces were too short to bow, warp or twist. Wrong.

The job was more difficult than it had to be, but it’s rustic right? Rustic is a great rationalization.

buildingbackClamping the back boards to one back leg, the job was fairly easy until I had to attach the second back leg. That’s when I noticed slight twists in those tiny short 13″ boards. This would mean that I could line them up perfectly with the 2nd back leg but the twist in the short back boards would make the leg slightly crooked. Rustic. That’s the ticket.

chairbackNext on the assembly list is the chair front. The front apron wasn’t too deformed so attaching it to the front legs was ungainly, as usual, but not difficult.

chairfrontOnce the front of the chair was built and I leaned it up against the back I noticed problem 3. The plans were off by about 1/2 inch. The lowest back board, back apron board, was 1/2 inch higher than the front apron. Not quite enough slant to slide a guest onto the ground, but enough to make them feel like they would. The back apron had to be unscrewed and moved down so that the seat would be level.

Then it was time to add the side boards. The plans said to attach the side boards 1/2 inch from the outer edge of the legs. I measured and marked the spots. These boards also needed to be attached flush to the top of the front legs and even with the top of the back apron.

chairframeVoila! A chair frame. This was when that slightly crooked back leg began to neener me. Because that one back leg was slightly crooked, the chair wobbles slightly. Rustic. That’s what it is.

Next it was time to screw in the extra seat support board. This board needed to be attached flush against the back apron board, between the two side boards. It didn’t fit. It was, guess what, about 1/2 inch too long. Either the side boards needed to be removed and attached at a little less than 1/2 inch from the edges of the legs or the support board is going to have to be cut again. These are 2x4s. No one is going to fall through them. I’ll recut that support board at some point, but not today dammit.

Next, the three middle seat boards needed to be attached to the front and back aprons. You have NO idea how joyful I was when all three boards fit neatly, and without argument, through the opening in the back. If that measurement had been off I might have just had a bonfire at that point.

Next it was time to add the side seat boards. This is where that slightly crooked leg gave me a full on raspberry. One side seat board was lovely and even with the three middle seat boards. The other, not so much.

chairWe have a jigsaw. Nuff said.

Once the other chair and the table are built, we’ll sand, putty and paint. For all it’s issues, it’s still a cute chair! You can find the plans for it here: http://www.morelikehome.net/2012/10/day-4-build-simple-chair-with-2x4s.html

If you build this chair, it might be wise to build the front of the chair first. This way you can be sure that the back apron is attached at the same height as the front apron. Also, before attaching the side boards, place the seat support between them and mark where the outer edge of the sides strike the legs.

 jailedagainThe dastardly dachshunds were jailed by the open back door. They just don’t understand why their help is not appreciated.

Share this:

  • Click to share on X (Opens in new window) X
  • Click to share on Facebook (Opens in new window) Facebook
Like Loading...

Make a Chalkboard Out of a Used Cabinet Door

08 Sunday Feb 2015

Posted by Jean in Home Decor

≈ 6 Comments

Tags

cabinet, DIY, do it yourself, home decor, wood craft, wood crafts

This is so easy it’s almost embarrassing to post it. Almost. There are still folks out there that have not picked up on the many wonders of used cabinet doors. If you’ve read my blog, you’ve seen me turn them into serving trays, a tech cabinet, an outdoor planter, and even a patio storage bench.

Last year I scored a pickup load of used cabinet doors for about 1.00 each. They came in various sizes and widths and the fellow I bought them from even threw in a 5 gallon paint bucket filled with hinges for them. Those I found on Craig’s List, but since then I have found that every Habitat for Humanities ReStore I have visited has a selection of these gems as well for only 2.00- 4.00 ea. depending on size. STILL a bargain because I am highly likely to run out of cabinet doors long before I run out of uses for them.

I have finally recognized a need for a chalkboard. Not enough of a need, mind you, to paint an entire wall or back splash with a writing surface, but a need for a larger reminder than sticky notes provide. I chose a 16 and 1/4 x 21 and 1/2″ cabinet door from my pile. (This is also a good size for a large serving tray.)

Because I like the rustic look and because I’m quite fond of green, I used a Hunter Green spray paint and gave the cabinet door a light coat all over. This allowed the wood tones to show through.

paintcabinetdoorNot into the rustic look? Not a problem. Choose what ever color you wish and use enough coats to completely cover up the wood. You’ll need to let each coat dry thoroughly before applying the next.

I then taped the “frame” of the door to make it easier to roll on the chalkboard paint without worrying about getting it all over the edges.

tapecabinetdoorI have a quart of Disney black chalkboard paint. You can get other brands and other colors. I also found a site that says you can DIY your own chalkboard paint in a treasure trove of colors using non-sanded grout mixed with semi-gloss latex paint in whatever color you wish! For those of you that want to paint an entire wall, this would be a more economical option: http://www.houzz.com/ideabooks/3454588/list/diy-make-your-own-chalkboard-paint.

You’ll need two coats of the paint rolled on with a small paint roller. The first coat must dry at least 4 hours. I simply let mine sit over night and finished up the next morning. However, you could roll on one coat in the morning and the 2nd in the afternoon.

2coatschalkboardpaintOnce both coats are dry, run a utility knife under the edge of the tape to prevent any of the chalkboard paint from peeling up as you remove the tape.

letcure7daysWAIT! Don’t grab your chalk! Now that both coats are dry and you have removed the tape, the paint has to cure for 7 (SEVEN) days.

I’d love to tell you how well this worked, but I’ve got 6 days to wait 😉  Next Saturday I’ll scribble out a message for you.

Share this:

  • Click to share on X (Opens in new window) X
  • Click to share on Facebook (Opens in new window) Facebook
Like Loading...

January Cure Final Week and Stuff Happens

07 Saturday Feb 2015

Posted by Jean in General Farm Stuff, January Cure

≈ 2 Comments

Tags

DIY, do it yourself, home decor, January Cure, pallet, wood craft

The final week of the Apartment Therapy January Cure and I was IN THE ZONE boy. Over the weeks, I’d organized, polished, cleaned, dumped, and managed to keep the house that way. I was on a rampage. I could see the finish line!

The final big weekend project was the living room. Mine is all part of one big room comprising the kitchen, a dining area and living room. With the kitchen sparkling, my desk organized, and once the dining table was cleared off, there really wasn’t much left for that room. I keep it dusted and picked up because it’s where all visitors land. My long bookshelf/plant stand by the picture window needed attention, but other than that, the room was good to go. I figured 3 hours tops would take care of it. Thus, I commenced with the before pictures.

bookjumblediningroom(That mess was NOT my fault. My son needs to set up a drop zone of his own, in his room instead of using the table as a drop zone. The dastardly rug rumpling dachshund duo need to… well nothing I can do about them except continually straighten rugs.)

livingroom1(No, we’re not protecting the living room from alien brain sucking waves. Aluminum foil works like dastardly dachshund kryptonite to keep them from jumping on and off the furniture. Yes, this is my life.)

So, a couple of hours work should have handled this. I could get more things done than just the living room like continue work on the laundry room and add a single shelf in my bedroom to replace the sad little faux wood bookshelf that is no longer needed. I was confident. Too confident.

Friday, my son and I went to town to pick up a board and a couple of decorative wooden corbels. I had a couple of other errands to run and we stopped in at a Sonic Drive in to grab lunch to take home. That’s where the demise of the weekend began. My son and I have done so much DIY wood working over the past year, that we cannot see a pile of wood without stopping to gawk and dream up ways to use that pile of wood. Well, that very Friday morning that very Sonic drive-in was doing some remodeling and had piled a whole mess of wood in one of the parking slots. We just HAD to ask about it and early Saturday morning we were back with a big trailer.

freewoodThat is a 15 foot trailer. We filled it.

It looked like a lot of wood in the parking slot. It was even more than we thought. It was also heavier than we thought. The winch on the trailer proved to be non-functional so John had to haul these LONG pallets up onto the trailer manually. I can lift, but I can’t carry. All I could do to help was lift and shove from the back, while John dragged from the front. Nothing, at least for us, is as easy as it first appears. Which should have warned me about the rest of the weekend.

I, and this WAS my idea, decided that the easiest and fastest way to unload these mega heavy long pallets was to chain them to the tractor, haul them off the trailer and drag them to a designated “stuffwewillprobablyuse” pile next to one of the corrals. It sounded like a good plan.

My tractor in a memorial to my hubby

tractorandstarsMy tractor is a 1957 Ford 800 series. Thank goodness. I’m not sure if some shiny new green monster would have had a sense of humor about what we did. Because she’s a mature girl (old), she pretty much demands fresh gas if we haven’t cranked her up in a while. We thought we had some. One gas can was empty but the 2nd can was near full (“2nd can” should have been a damned good clue for me, but I wasn’t paying attention and we were rushed for time) and John poured about a gallon into the tank, way more than enough to do this job but I figured I’d drag down some weeds around the property when we were done with the wood.

We tried cranking the tractor, she was reluctant. Very reluctant. Only with a LOT of coughing, sputtering and a cloud of smoke… wait.. I don’t remember her smoking before? But she eventually started. I backed her out into the middle of the backyard, John positioned the truck and got the chain attached to the pallets. I put the tractor in gear to haul the pallets off the trailer and the engine conked out. Starting efforts proved fruitless and drained the battery. This meant we had to move a car around to charge the battery. Starting efforts remained fruitless which meant we had to call a neighbor over for advice. It was while awaiting the arrival of the neighbor that my brain coughed up an old factoid. Wasn’t there a can of old boat gas in the garage? “JOHN? What was in that gas can you put in the tractor? Was that boat gas?” “Dunno.” facepalm. Boat gas, requires added oil. Tractor engines don’t appreciate oil added to their gas. This would explain the smoke. This would also explain the dark blue colored gas my neighbor found in the sediment cup.

The neighbor, kindly, chained the pallets to his truck and we did get them unloaded. He didn’t laugh. Much. The remainder of Saturday (not much left of it by then) and most of my Sunday were spent adding small amounts of good fuel to the tractor, and then draining out the oiled fuel over and over and over because, of course, the tractor had quit on a slight hill and wouldn’t fully drain. The best we could hope for was to weaken the mix enough for the tractor to start. As I said, thank goodness they made tractors the way they did in 1957. I was born the year before this tractor and I’m thinking it’s not a coincidence that they made my tractor well enough to stand up to me. They saw me comin’. The tractor finally cranked up Sunday afternoon, although her gas is still faintly bluish. Bless her.

This incident was followed by two days of rain, the discovery of a leak in the ceiling over my kitchen sink, running errands for my heroic, engine expert neighbor’s wife, and then post rain clean up of the barn and corrals (yes, the tractor is still running). My entire final week of the Cure was shot. However, I did manage to clear out and organize the bookshelf, vacuum it thoroughly (including the books) pitch the old non-working stereo and untangle all the plants that had gotten so happy they’d started moving into each others pots. My son also cleared all his dropped items off the dining table which is now, serving as a temporary surface for a craft idea I decided to work on yesterday so it’s still non-functioning as a dining area.

As for my laundry room and that shelf I was going to build in the bedroom, well, to quote Albus Dumbledore after working up the courage to try a Bertie Bott’s Every Flavor Bean, “Alas, earwax”.


Share this:

  • Click to share on X (Opens in new window) X
  • Click to share on Facebook (Opens in new window) Facebook
Like Loading...
← Older posts
Newer posts →

Posts, stories, woes, vittles, photo and video evidence

Categories

Enter your email address to follow this blog and receive notifications of new posts by email.

Join 45 other subscribers

Current woes, tall tales, and lessons learned

  • Here are the mutts.
  • January Cure 2018- Flowers and Floors and Stuff
  • January Cure 2018 Day 2- Make a list
  • January Cure 2018- Day 1- Clear and Organize a Drawer
  • January Cure 2018: But first a word from our sponsor
  • January Cure Weekend 1- Flowers and Floor
  • Day 3 January Cure 2017- Purge the Pantry vs Cabinet Cleanout
  • Day 2 January Cure 2017- Making a List (humming- checking it twice)
  • January Cure 2017 Day 1
  • Billiam’s List Bedroom Tile: Pat us on the head!

Tags

cabinet cabinet doors chickens cleaning cleaning house cleaning stainless death of spouse desert gardening DIY diy chair do it yourself dreams of dead spouse easy bedspread easy cotton bedspread egg bound farm floors garden garden bed gardening grief hanging bed heirloom squash hens home cleaning home decor home furniture home improvement homemade furniture home organization horse house cleaning how to handle grief how to hide cord clutter how to make serving trays January Cure January Cure 2016 January Cure 2017 January Cure 2018 landscaping mayo arrote miniature horse no sew bedspread off road wheelchair organic gardening organizing ottoman outdoor furniture outoor furniture pallet patio patio chair patio furniture pumpkin serving trays squmpkin storage bench swinging bed TankChair tank chair tech storage tie-dye tie-dye bedspread to-do lists tools tracked wheelchair tree trimming upcyle cabinet door upholstery wood chair wood craft wood crafts wooden chair wood furniture yard

Blog at WordPress.com.

  • Subscribe Subscribed
    • Jean's Blog of Life, Farms and Everything
    • Join 45 other subscribers
    • Already have a WordPress.com account? Log in now.
    • Jean's Blog of Life, Farms and Everything
    • Subscribe Subscribed
    • Sign up
    • Log in
    • Report this content
    • View site in Reader
    • Manage subscriptions
    • Collapse this bar
 

Loading Comments...
 

    %d