• As Life Would Have It

Jean's Blog of Life, Farms and Everything

~ Welcome to life on our mini-farm in the AriDzona desert!

Jean's Blog of Life, Farms and Everything

Tag Archives: cabinet

Make a Chalkboard Out of a Used Cabinet Door

08 Sunday Feb 2015

Posted by Jean in Home Decor

≈ 6 Comments

Tags

cabinet, DIY, do it yourself, home decor, wood craft, wood crafts

This is so easy it’s almost embarrassing to post it. Almost. There are still folks out there that have not picked up on the many wonders of used cabinet doors. If you’ve read my blog, you’ve seen me turn them into serving trays, a tech cabinet, an outdoor planter, and even a patio storage bench.

Last year I scored a pickup load of used cabinet doors for about 1.00 each. They came in various sizes and widths and the fellow I bought them from even threw in a 5 gallon paint bucket filled with hinges for them. Those I found on Craig’s List, but since then I have found that every Habitat for Humanities ReStore I have visited has a selection of these gems as well for only 2.00- 4.00 ea. depending on size. STILL a bargain because I am highly likely to run out of cabinet doors long before I run out of uses for them.

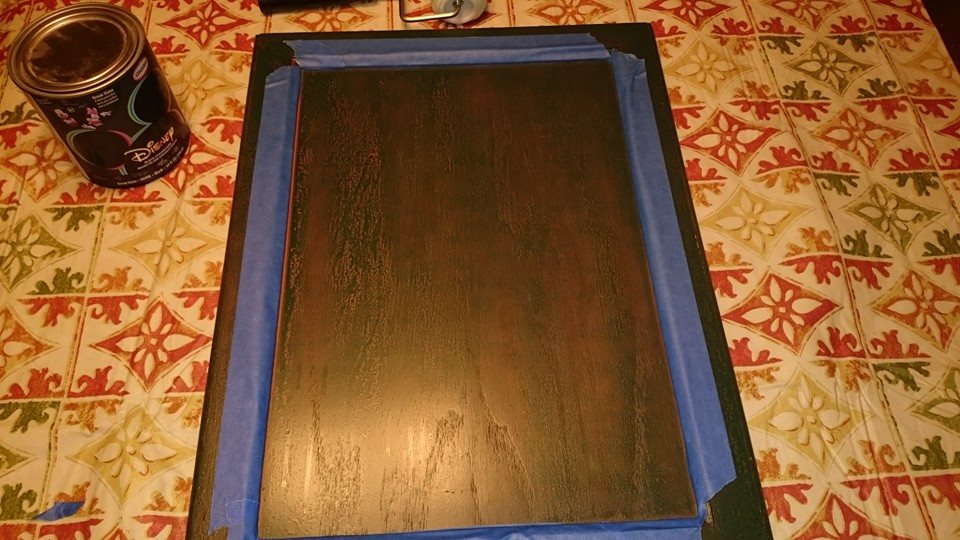
I have finally recognized a need for a chalkboard. Not enough of a need, mind you, to paint an entire wall or back splash with a writing surface, but a need for a larger reminder than sticky notes provide. I chose a 16 and 1/4 x 21 and 1/2″ cabinet door from my pile. (This is also a good size for a large serving tray.)

Because I like the rustic look and because I’m quite fond of green, I used a Hunter Green spray paint and gave the cabinet door a light coat all over. This allowed the wood tones to show through.

paintcabinetdoorNot into the rustic look? Not a problem. Choose what ever color you wish and use enough coats to completely cover up the wood. You’ll need to let each coat dry thoroughly before applying the next.

I then taped the “frame” of the door to make it easier to roll on the chalkboard paint without worrying about getting it all over the edges.

tapecabinetdoor
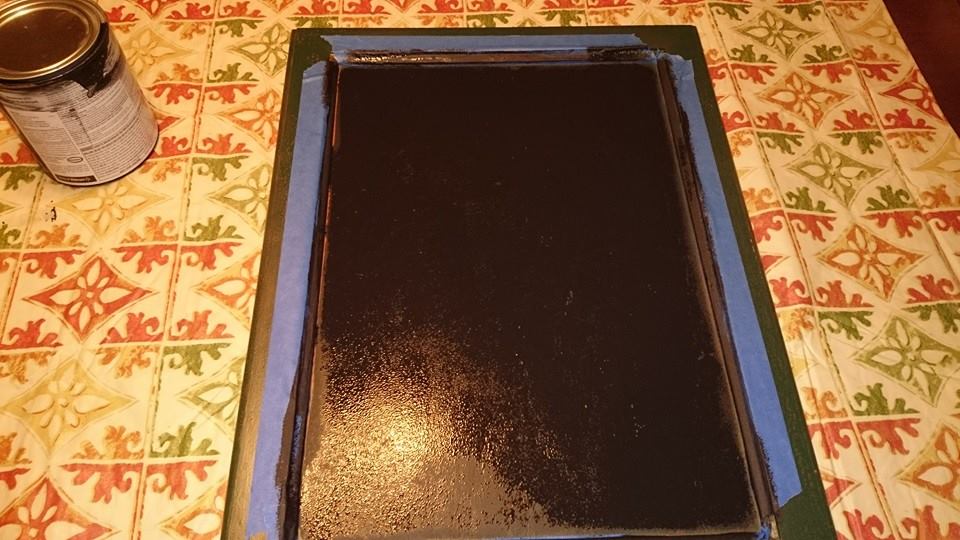
I have a quart of Disney black chalkboard paint. You can get other brands and other colors. I also found a site that says you can DIY your own chalkboard paint in a treasure trove of colors using non-sanded grout mixed with semi-gloss latex paint in whatever color you wish! For those of you that want to paint an entire wall, this would be a more economical option: http://www.houzz.com/ideabooks/3454588/list/diy-make-your-own-chalkboard-paint.

You’ll need two coats of the paint rolled on with a small paint roller. The first coat must dry at least 4 hours. I simply let mine sit over night and finished up the next morning. However, you could roll on one coat in the morning and the 2nd in the afternoon.

2coatschalkboardpaintOnce both coats are dry, run a utility knife under the edge of the tape to prevent any of the chalkboard paint from peeling up as you remove the tape.

letcure7days
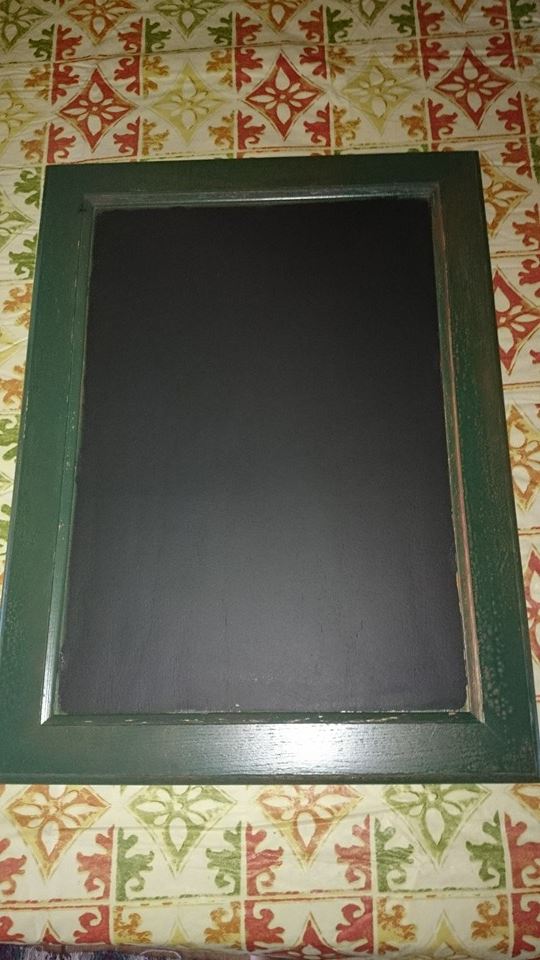
WAIT! Don’t grab your chalk! Now that both coats are dry and you have removed the tape, the paint has to cure for 7 (SEVEN) days.

I’d love to tell you how well this worked, but I’ve got 6 days to wait 😉  Next Saturday I’ll scribble out a message for you.

Share this:

  • Twitter
  • Facebook

Like this:

Like Loading...

How to Hide Technoclutter

28 Friday Mar 2014

Posted by Jean in Wood Crafts

≈ 2 Comments

Tags

cabinet, DIY, do it yourself, how to hide cord clutter, tech storage

A few months ago I worked very hard to get rid of the clutter on my counter tops. This involved de-cluttering the cabinets underneath, specifically de-cluttering the cabinet lazy susan which was on Billiam’s List, and was an all day process. As I surveyed the lovely results of my labor, my gaze ground to halt at the site of all the technocrap and cords that really could not go elsewhere. For several weeks this was a source of much grumbling every time I looked at it. With the Craig’s List finds, I did something about it. The technomess has been contained!

technomessThis was my technomess. Phone, weather radios, iPod, and the giant multi-plug.

technoshelfFirst I measured the space I would need to neatly and snugly corral the technology. I’d found a truck load of used and leftover lumber pieces and cabinet doors on Craig’s List just for such projects. I used 1 X 3 pine boards for the frame and shelf insert. The outer frame is connected with 1 inch stainless steel corner braces. The inner shelf is supported by trimmed scraps from the 1 X 3 inch boards which are glued in place with wood glue prior to painting the shelf. Because the shelf is not there to support anything heftier than an iPad and cell phone, I didn’t bother with wood screws. The glue is fine for this purpose. Once the glue was dry, I painted the entire unit.

technocabinetNot only did the shelving have to fit the technology I was trying to hide, it also had to fit one of the used cabinet doors I found on Craig’s List. I built it so that there is a slight lip on the sides and top for easy raising and lowering without hardware. The fellow I bought the used cabinet doors from, threw a 5 gallon paint bucket of hinges into the bargain. I’ll not need to buy hinges in the foreseeable future. Because the cabinet door had been poorly stained and fairly abused, it required sanding. I then covered it with a thin coat of the same Apple Butter paint color that is on the kitchen walls and let it dry. Next I painted on a thin layer of the green that I’d used on the shelving and let that dry. Once the paint was dry I sanded it so that some of the wood, some of the yellow and some of the green showed. After wiping off the dust from sanding, I brushed a coat of Minwax Espresso stain over the entire door and let it soak in for about 10 minutes before wiping it off.

This process of paint, rough sanding and stain is what gives the finished piece the weathered and aged look I am fond of, but you can easily just use a gloss paint or a polystain for whatever look you like. You could also use a nice wooden picture frame that you can attach small hinges to for the door and use a nice photo or painting to cover the clutter within. Once the finish had dried, I coated it with polyurethane so that it’s easy to wipe down with a damp rag. I do use that kitchen and I wanted to be able to clean mixer spatter off of that cabinet. I added the hinges on the bottom so that I can easily swing the door down to access the phone, radios and plug my mixer into the gigantoplug.  TaDA! Technomess containment has been achieved.

Share this:

  • Twitter
  • Facebook

Like this:

Like Loading...

Posts, stories, woes, vittles, photo and video evidence

Categories

Enter your email address to follow this blog and receive notifications of new posts by email.

Join 45 other followers

Current woes, tall tales, and lessons learned

  • Here are the mutts.
  • January Cure 2018- Flowers and Floors and Stuff
  • January Cure 2018 Day 2- Make a list
  • January Cure 2018- Day 1- Clear and Organize a Drawer
  • January Cure 2018: But first a word from our sponsor
  • January Cure Weekend 1- Flowers and Floor
  • Day 3 January Cure 2017- Purge the Pantry vs Cabinet Cleanout
  • Day 2 January Cure 2017- Making a List (humming- checking it twice)
  • January Cure 2017 Day 1
  • Billiam’s List Bedroom Tile: Pat us on the head!

Tags

cabinet cabinet doors chickens cleaning cleaning house cleaning stainless death of spouse desert gardening DIY diy chair do it yourself dreams of dead spouse easy bedspread easy cotton bedspread egg bound farm floors garden garden bed gardening grief hanging bed heirloom squash hens home cleaning home decor home furniture home improvement homemade furniture home organization horse house cleaning how to handle grief how to hide cord clutter how to make serving trays January Cure January Cure 2016 January Cure 2017 January Cure 2018 landscaping mayo arrote miniature horse no sew bedspread off road wheelchair organic gardening organizing ottoman outdoor furniture outoor furniture pallet patio patio chair patio furniture pumpkin serving trays squmpkin storage bench swinging bed tank chair TankChair tech storage tie-dye tie-dye bedspread to-do lists tools tracked wheelchair tree trimming upcyle cabinet door upholstery wood chair wood craft wood crafts wooden chair wood furniture yard

Blog at WordPress.com.

  • Follow Following
    • Jean's Blog of Life, Farms and Everything
    • Join 45 other followers
    • Already have a WordPress.com account? Log in now.
    • Jean's Blog of Life, Farms and Everything
    • Customize
    • Follow Following
    • Sign up
    • Log in
    • Report this content
    • View site in Reader
    • Manage subscriptions
    • Collapse this bar
 

Loading Comments...
 

    %d bloggers like this: