• As Life Would Have It

Jean's Blog of Life, Farms and Everything

~ Welcome to life on our mini-farm in the AriDzona desert!

Jean's Blog of Life, Farms and Everything

Category Archives: Home and other Repairs

Things I’ve had to learn to fix around the house, where I’ve found the knowledge, and why we can seldom accomplish these fixes in the same time frame as those guys on You Tube.

Wood Patio Table/Work Table DIY

20 Tuesday May 2014

Posted by Jean in Home and other Repairs, Uncategorized, Wood Crafts

≈ Leave a comment

Tags

DIY, do it yourself, home decor, home furniture, homemade furniture, outdoor furniture, patio, patio furniture, wood craft, wood furniture

Our back patio is approximately 48 feet long by 12 feet wide. One end is open and the other end adjoins a wall. Having such a large patio is great on one hand because of the outdoor space it provides. On the other hand, however, that’s a long space to fill up! Our back door leads down onto the patio at about the halfway point. Being an entry way to the outdoor room the patio will eventually be, the steps will naturally bisect the space into two halves. Rather than trying to tie the entire long patio together like some sort of banquet hall, it seems natural to me to make two areas.

The grilling  and main dining area will be on the north, open ended side. The sitting, socializing, and sipping tea or cocktails side will be the southern end with the wall. I thought this a natural set up because aftah all, that’s what we do in the south, we sip sweet tea or cocktails and socialize. Actually, my real reason is that the grill should, of course, go on the open ended side of the patio so that the smoke can waft out and away from the patio, and go up the street to make my neighbors drool.

pationorth
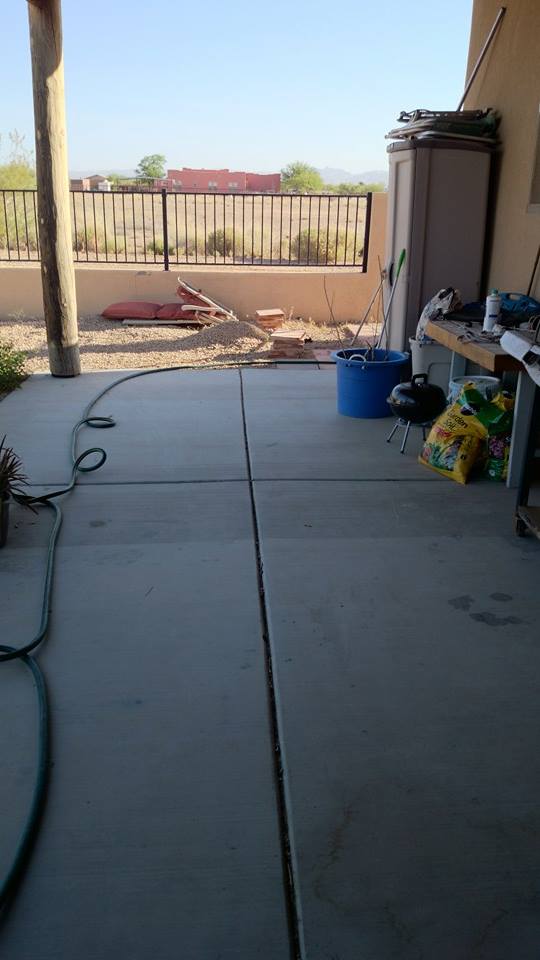
ACK! Don’t look at the mess. This is why people never see pictures of the north end of the patio when I’m out there taking pictures of the pretty plants. This is the end with the big grey plastic monstrosity holding the pool tools and toys, the grill, and a table where we pot plants. Consider this the before picture and try to imagine an outdoor kitchen and dining area here instead of the current clutter.

patiosouthThis is the south side of the patio, with all the pretty plants, and Belle the barn dog who is currently being employed to keep the rabbits and squirrels from devouring the pretty plants. She’s a bit of a micro-manager when it comes to supervising the projects though. This area and the garage are being used as work spaces for our projects. This patio is closed due to construction

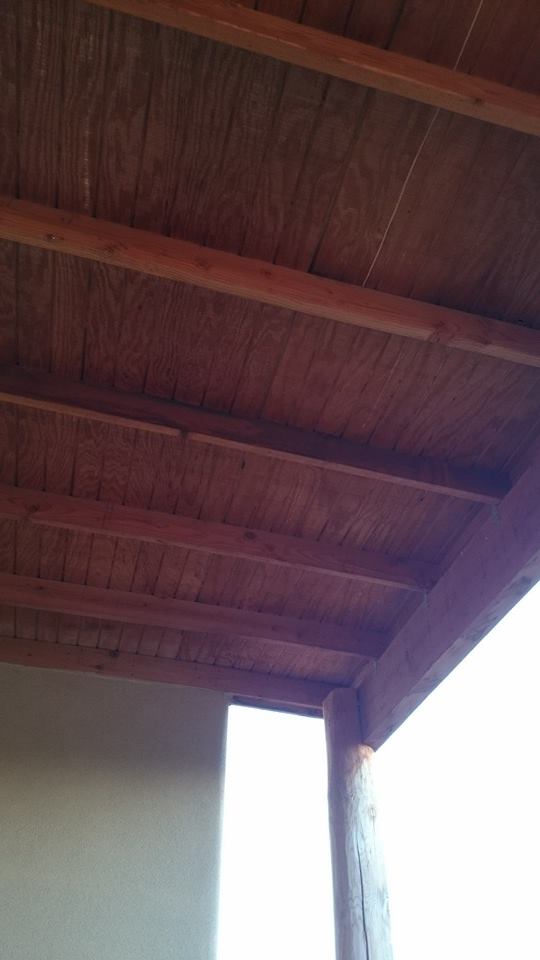
The southern end of the patio has that big blank beige wall, and a tiny door to the master bedroom in the corner. I have planned to build a seating area with two storage benches and two chairs, but I hadn’t decided what to do with the big blank wall. Briefly, I considered painting a mural. Then I remembered that I would have to live with whatever I painted. That caused a cringe. As I was surfing through decorating and DIY websites, I came across the use of mirrors outdoors.

Several years ago a friend gave me a large framed mirror that she could no longer use. I knew I could use it, I just didn’t know where to hang it so that it would reflect anything in my house that I wanted to see twice every time I came in the room. When I saw the patio mirrors on the internet, I knew just what to do with the big blank wall. I can’t just have a big mirror on the wall, so we’re building a small table that I can use to work on the patio projects. Once the patio projects are finished, I will paint the table and place it under the big mirror, and fill it with plants, candles, and whatever pretty stuff I think might be safe there.

patiotablejoining
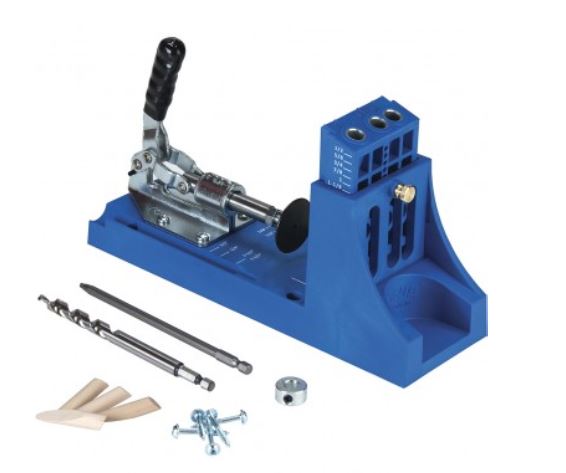
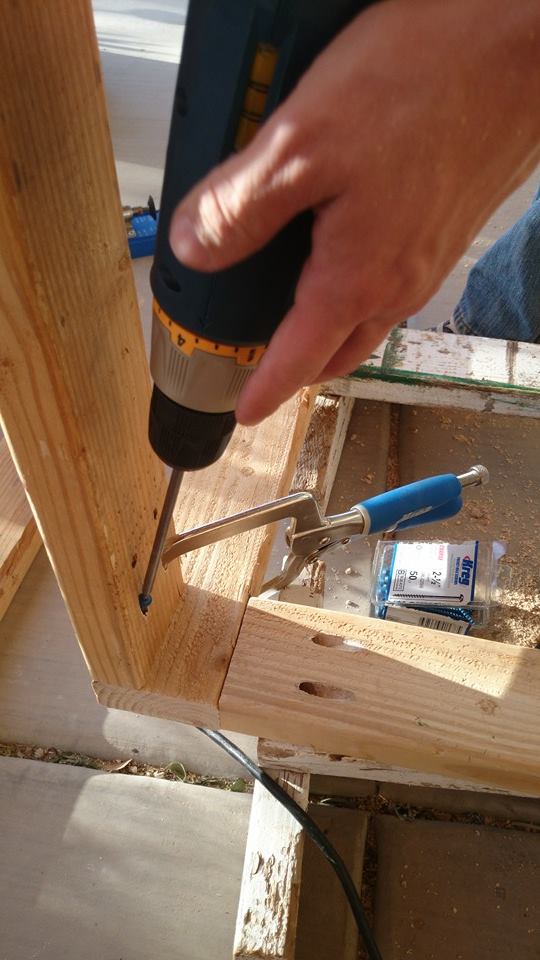
We decided on this simple project not only because it is functional and I needed a table, but also because we wanted to practice our pocket hole joinery technique before moving on to more complicated projects. We first pre-drilled all of the necessary pocket holes for the frame boards. After that, joining the pieces went faster than assembling any furniture I’ve ever bought in a box.

patiotableframeThe completed table frame is also much sturdier with our pocket holes than anything I’ve ever put together out of a box. The screws hold fast without using glue!

patiotableWe were going to use pocket holes to attach the table top and the only thing that stopped us, as usual, was that we didn’t have enough screws. Instead, we drilled in from the top to attach the boards. If this had been a project I planned to stain, I’d have probably waited and bought more screws, but because we’re leaving it unfinished to use as a work table and, in the end, will be painted, I’ll just fill the shallow holes around the screws before I sand and paint.

You can find the plans for this project, along with 30 more things to do with 2x4s here: http://www.morelikehome.net/2012/10/day-30-build-2×4-craft-table.html


Share this:

  • Click to share on X (Opens in new window) X
  • Click to share on Facebook (Opens in new window) Facebook
Like Loading...

My Mother’s Day DIY Tools As Much Fun as Candy

18 Sunday May 2014

Posted by Jean in General Farm Stuff, Home and other Repairs, Rural life, Uncategorized, Wood Crafts

≈ Leave a comment

Tags

DIY, do it yourself, landscaping, tools, tree trimming, upholstery, wood crafts

I am not without tools, William saw to that. We have tools that I had when I was a single Mom, tools that William bought throughout his years of home ownership, and a lot of the tools his father had collected. We have hand saws, table saws, drills, sanders, grinders, a tile saw, drill press, a collection of screw drivers, hammers, and wrenches of all descriptions. We are not tool poor. There are quite a few power tools, however, that we have simply done without because we had the hand tools.

For Mothers Day this year, I made my sons shopping chores easy for them. I gave them a list of tools that would have made William’s home improvement life easier and will now make my DIY life and yard work easier.

kregjigThis Kreg Jig K4 kit has already allowed us to make headway on the arms and back for the swinging bed, and will make building the frame for the next planter boxes and storage bench much easier and neater. This kit is available at Home Depot, but Home Depot doesn’t carry any of the nifty clamps that make pocket hole work so easy. Lowes has a better selection of accessories and screws for this jig.


powerstaplerThis Chicago Power Stapler is great for all the projects I have planned which require upholstery. I used it to upholster the top for the storage bench and it drove the staples in straight and fast. No bent staples to remove! There is a trigger safety lock and the tool weighs less than 2 lbs. so it was easy for my old lady hands to use. This stapler came from our local Harbor Freight.


ryobipolesawUntil now, all we’ve had to trim the trees have been long pruning shears and a bow saw. We set this Ryobi Pole saw up and put it to work immediately. We trimmed every over grown mesquite tree in our yard into shape in about an hour and a half. Those were big trees and thick branches too! We’re using this saw to cut up the branches we removed. Some will go to DIY projects and some will go into the firepit to makes some splendidly flavored grilled meats. This was a tool I knew I could handle and it was a lot less scary to me than a chain saw. These are available at Home Depot

I love chocolate as much as any chocoholic Mom, but I’ll take tools that save the time and strength I don’t have over a Whitman’s Sampler any day!.

Share this:

  • Click to share on X (Opens in new window) X
  • Click to share on Facebook (Opens in new window) Facebook
Like Loading...

Surprise! It’s a Hanging Bed!

08 Thursday May 2014

Posted by Jean in Home and other Repairs, Uncategorized, Wood Crafts

≈ 1 Comment

Tags

DIY, garden, garden bed, hanging bed, pallet, swinging bed, yard

First I’ll show this picture of the bed and then I’ll tell you why this is not the hanging patio bed we originally planned. We will be putting the arms on this week and painting it when the winds die down.

surpriseproject4bedboxWhen we started this project, we had seen several articles about hanging patio beds, how to build them and even people selling them. Looking at the beds themselves, we knew this would be a big project and we’d have to figure out how to do many things, but we really wanted to give it a go. We had all the items we needed to build the bed from the freebie pallets to the Craig’s List wood pile and all we’d need to purchase would be the hardware. We thought. Remember in the blog post “Surprise Project 2: The Surprise is On Us” I mentioned not putting off something you know is going to be a problem later? Yeah, well, here is a picture of the problem we put off until after we put the 150 lb bed together.

surpriseproject4patioproblemoI saw this problem before we began and after seeing all of those handy dandy videos and tutorials, including one from Home Depot, I thought we could figure out a way to deal with it later. The problem is that those are simple 2 x 6s attached to the house with joist hangers. The outer edge of the patio is supported by 4 x 10 beams supported by large log columns. I knew we’d need to figure out a way to bolster the support system of the 2 x 6s but didn’t know how to add support to where the beams join the house. Turns out we couldn’t. After speaking with the very helpful and informative manager of the lumber department at our local Home Depot, we learned that our 6 to 12 pack a day builder had built our patio roof as if it were a simple addition and not the new construction that it was. He told us that most homes under construction have the patio roof firmly attached to the frame of the home and roof. Our guy, slapping up houses cheap and fast during the real estate boom of ’05, did not. Those beams you see up there are attached to nothing more than the fascia. The bed alone might have pulled the fascia down and putting people on the bed would have been calamity.

We considered plan B, which was to hang the bed in a two point system from the large, well supported beam at the outer edge of the patio seen below.  Our patio faces west. This is Arizona. During our 4 month season from hell, the patio can reach 130 degrees by the time the full sun hits it in the afternoons. So right from the get go I didn’t want to hang the bed right where the sun would hit it for 6 to 8 hours. I also didn’t feel the two point system attached to the main beam would allow it to swing in a stable manner. It seemed to me that this would cause a hammock effect and I didn’t want to get dumped onto the patio. Thirdly, our patio has three access points to the pool and back yard. The only way to hang the bed on that one beam would have blocked one of those access points.

surpriseproject4mainpatiobeamThis left us with Plan C., which was to build a very sturdy frame that would stand up to the swinging motion of the bed in four directions as well as 600-700 lbs of weight. Back to Home Depot we went, I’ve been there so many times per week now that even when I don’t need to go my truck has bypassed the grocery that was my intended target and wound up in the Home Depot parking lot. We waited to speak to the chief wood guru who was nice enough to help me decide which wood and size that would handle our load bearing issues. I cannot stress enough that newbies to DIY, like us, take the time to wait and ask the head honchos in each department for their advice. The two top guys in the lumber area at our local Home Depot have been invaluable. You may have to actually corner these guys because they are always busy, and you may have to use a little patience and tact if they hit you with a statement like “Unless I came to your house and looked I can’t tell you what would work…” or something to that effect. Simply ask something like “How can I describe this to help you visualize the problem”, be ready to draw pictures or even better, have photos on your cell phone handy to show, because we all know they are not coming to your house to look at the problem.

For the frame, we chose two 10 ft. 4 x 6 fir beams, one 8 ft. 2 x 6 fir beam, and four 8 ft 4 x 6s for the posts. We used 8 inch carriage bolts to attach the long beams to the posts, and four 3 inch screws to attach the 2 x 6s to the posts on each end of the frame. The 2 x 6s are non-weight bearing and are just there to provide the necessary stability for the back and forth motion of someone on the swing. We used four heavy duty 8″ eye bolts on the long beams and four heavy duty 6″ eye bolts on the bed frame. We set the posts so that there would be about 8 inches of swing room side to side to accomodate random jostling, and about the same back to front to quell the urge for excessive swinging. The bed still swings aplenty back to front, but we didn’t want anyone going crazy with it.

surpriseproject4frame

When setting the posts, we leveled each one every step of the way and leveled each long beam and side support. The 8′ posts are sunk 2 feet into the ground in cement, bringing the height of the frame to six feet tall. As there isn’t enough room to walk under the frame, due to the size of the bed, we felt this was sufficient because anyone taller than six feet would be in the process of sitting, seated, or snoozing and wouldn’t bonk their head. Our excessive leveling process really paid off because the bed swings true. We hung the bed two feet from the ground and used four feet of heavy duty chain on each corner.

We still need to add the arms and back and hope to incorporate some of the natural mesquite branch trimmings. I have a mattress topper on order and will be painting the bed and frame, but it’s already quite a lovely addition to the back yard and it’s been a real temptation to nap already.

Update: Finally got the mattress and linens for the bed. Here’s how it looks all dressed up!

hangingbeddressedupOf course, it’s the end of May and it’s 95 degrees in the shade at 10:00am, but I’ll be able to cozy up and enjoy it this evening, or maybe ’round midnight, for a week or two until it’s 95 degrees at midnight. This fall it will be glorious though!


Share this:

  • Click to share on X (Opens in new window) X
  • Click to share on Facebook (Opens in new window) Facebook
Like Loading...

Surprise DIY project 3

04 Sunday May 2014

Posted by Jean in Home and other Repairs, Uncategorized, Wood Crafts

≈ Leave a comment

Tags

DIY, do it yourself, homemade furniture, patio, wood craft

I suppose the suspense of waiting to find out more about this project does require a few posts just to keep it going. Unfortunately, when there’s been nothing to report, I can report nothing. It’s “spring” in the desert and I don’t have an enclosed work space for the wood projects. The wind has ground most projects to a complete halt.

Since our work is done in the garage or on the patio, anything requiring paint, stain or urethane is stacked up waiting for the wind to stop blowing half a ton of desert dirt and debris over everything. I have spent most days looking like one of the sand people from Star Wars, with my face mask, safety goggles, protective clothing and my iPod plugged into my ears and that’s just to feed hay to the ponies. The incessant roaring and buffeting of the wind blocked my ability to think of anything except the incessant roaring and buffeting of the wind, and made it impossible for us to do the thinking required to solve the problems we’ve faced on this project.

The wind has calmed, temporarily, for the past two days. Just long enough for me to figure out what we need to do to move ahead on the project again, get the materials, and get to work on Plan C.  Plan A had to be scrapped thanks to some less than professional work by the 12 pack a day builder. Plan B was scrapped because I couldn’t have lived with that alternative. Plan C., however, will not only solve the problems faced with the previous plans, but it has the added bonus of checking off another of the things on Billiam’s To-Do List.

Plan C. required digging through the hard packed, dry, rock filled desert dirt. Yesterday was our first 100 degree day of the year. We’re also pretty busy trying to get the house and property spruced up for an upcoming interview regarding my TankChair, Sherman. John was at work on the project while I ran around picking up everything blown about by the winds last week, pulled more weeds, and cleaned the swimming pool (in time for more winds to arrive this afternoon). We couldn’t use a post hole digger or even the pick axe to dig these holes because this area is home to the pipes for the leach field of the septic system.

johndiggingsurpriseprojectWe’d hoped to get an early start on the project yesterday morning. We were at Home Depot at 9:00am and thought we’d be home and working by 10.  Everything that could impede progress at the store, impeded our progress. A new pallet of the wood we needed had to be retrieved from the uppermost shelves, the fork lift ran out of gas before the driver was able to finish loading the wood stack onto the empty shelves and the tanks had to be switched out, a manager from another department came past, noticed the fork lift loaded with wood sitting there and felt compelled to harrass the fork lift driver for something clearly beyond his control (before I lost my cool and asked her to please get out of his butt long enough for me to get my wood and go home because I’d been waiting almost an hour already), and a line 6 customers deep in the lumber section that stayed 6 customers deep for 10 minutes before another line was opened. Our “quick trip” to Home Depot that should have taken 30 minutes, took three times that. I really must rant in another section about being in a manual wheelchair at Home Depot, or any crowded business, on a Saturday in another section, but suffice to say, those issues contributed to some pretty severe frustration by the time we were finally on our way to load the pickup, and were partly to blame for me losing my cool in the above mentioned event.

Here are the materials we will be using to execute Plan C.

plancmaterialssurpriseproject

I will be doing more house and yard chores in preparation for the TankChair interview, but hopefully we’ll get a little more done this evening and tomorrow to show. Once the interview has passed, and the next bout of winds have abated we’ll be able to pick up the pace again and get this thing completed!


Share this:

  • Click to share on X (Opens in new window) X
  • Click to share on Facebook (Opens in new window) Facebook
Like Loading...

Busted Bullnose Corners- Billiam’s List

10 Thursday Apr 2014

Posted by Jean in Home and other Repairs, Uncategorized

≈ 1 Comment

One of the first projects I tackled on Billiam’s List, was repairing the dented, scarred and popped out bullnose corners in our house. Our 6-pack a day builder had not bothered with screws, he’d just planted the corners in sheetrock mud and painted over them. Of course, within months they’d pulled away from the dry wall in spots, if we banged them with anything at all they’d dent and pop away from the wall quite a lot. When we thought about what to do about them, all William could think of was to replace them entirely and this seemed a bit daunting at the time.

bustedbullnose1

After the memorial service was out of the way, I’d given a bright white coat of paint to most of the doors in the house and needed to line up another project quickly to continue keeping my mind, heart and hands busy. The fresh new paint seemed to highlight the horrid looking wall corners throughout the den (we’re talking every corner), so I started the Google search for replacing bullnose corners to see if it was something I could handle. That search led to finding out that people actually repair that stuff and don’t try to replace it unless it’s absolutely beyond all help. Who knew? Well, you likely did, but I didn’t.

The fix would require a bucket of sheetrock mud, a can of spray on texture, a putty knife, sand paper and matching paint. I had the putty knife. All I knew about the paint was that it was called Apple Butter. I’d bought it three years before when I repainted the house while William was in the hospital having tandem bone marrow transplants as treatment for his Hodgkin Lymphoma. I needed walls I could wipe with disinfectant to keep the house as germ free as possible. Lesson 1., Many, if not most, people probably know this but I did not. The big home improvement stores regularly retire their paint colors, every year to two years. This practice basically forces us to repaint entire rooms every year or two in order to keep them looking neat (unless you don’t bang into stuff, have ill behaved pets, and don’t leave finger prints) Because I knew the name of the color and the brand, the store was only able to tell me the paint had been discontinued and if they mixed it, it probably wouldn’t match the wall color. I had them mix a sample, took it home and painted over a couple of small scratches. It looked perfect so I had them mix up a gallon. Lesson 2., was learning that I should have waited a few days for the scratch test paint to cure to it’s final color.

Thinking the paint was a match and having collected the other supplies, I began on the frightening project of making the bullnose corners look even worse so that I could repair them. Taking the putty knife I scraped all of the old paint and texture off of and away from the damaged areas.

bustedbullnose2

The point of no return, knowing that this could easily end up being an uglier aggravation than the dented, buckled and scarred corners had been. Once this part was finished on eight (8) corners. I quickly proceeded to the next step, mostly driven by the terror of “oh my lord what have I gotten myself into this time?”

bustedbullnose3

First I used drywall screws to actually screw the damaged sections back into place and keep them there firmly. Using a small hammer, I carefully tapped the dents into as close to their original shape as possible. Next, I began applying the drywall mud. This part took me a lot longer than it took the guys in the YouTube videos, mainly because, again, driven by terror, I was afraid it would be more of an eyesore. Thus, I applied, scraped, applied, eyeballed from all angles and smoothed until the mud was on the corners and the corners were as smooth and rounded as I could get them with a putty knife. After the mud dried, I used a damp rag to smooth it out more and finally used a light grade sand paper to finish. The texture spray was almost my undoing. I never could get it to match the original wall texture but did get it to a point to where I could say “If anyone gets close enough to that to notice and tell me it doesn’t match I’ll just shove their nose into it.”

Once the texture had dried I painted. That’s when I noticed that the scratch test areas I’d painted three days before were a bit darker than the wall color. “Is that the color or is that a shadow? It’s just a shadow. No, it’s the color. No can’t be. Damn.” There’s only one area where the newer non-matching paint is terribly noticeable and, of course, it’s the area that is right out in front when people come in the front door. Heck with it, that’s a small wall, I’ll paint it the whole wall with the new paint one day and no one will ever know.

bustedbullnose4In spite of the non-matching texture and paint, the repaired corners look great compared to their badly damaged state. The issues are small and while the slightly darker paint color does provide an irritation when I roll past, it’s a mild irritation in the greater scheme of things that I can make better when I get a round tuit.


Share this:

  • Click to share on X (Opens in new window) X
  • Click to share on Facebook (Opens in new window) Facebook
Like Loading...
Newer posts →

Posts, stories, woes, vittles, photo and video evidence

Categories

Enter your email address to follow this blog and receive notifications of new posts by email.

Join 45 other subscribers

Current woes, tall tales, and lessons learned

  • Here are the mutts.
  • January Cure 2018- Flowers and Floors and Stuff
  • January Cure 2018 Day 2- Make a list
  • January Cure 2018- Day 1- Clear and Organize a Drawer
  • January Cure 2018: But first a word from our sponsor
  • January Cure Weekend 1- Flowers and Floor
  • Day 3 January Cure 2017- Purge the Pantry vs Cabinet Cleanout
  • Day 2 January Cure 2017- Making a List (humming- checking it twice)
  • January Cure 2017 Day 1
  • Billiam’s List Bedroom Tile: Pat us on the head!

Tags

cabinet cabinet doors chickens cleaning cleaning house cleaning stainless death of spouse desert gardening DIY diy chair do it yourself dreams of dead spouse easy bedspread easy cotton bedspread egg bound farm floors garden garden bed gardening grief hanging bed heirloom squash hens home cleaning home decor home furniture home improvement homemade furniture home organization horse house cleaning how to handle grief how to hide cord clutter how to make serving trays January Cure January Cure 2016 January Cure 2017 January Cure 2018 landscaping mayo arrote miniature horse no sew bedspread off road wheelchair organic gardening organizing ottoman outdoor furniture outoor furniture pallet patio patio chair patio furniture pumpkin serving trays squmpkin storage bench swinging bed TankChair tank chair tech storage tie-dye tie-dye bedspread to-do lists tools tracked wheelchair tree trimming upcyle cabinet door upholstery wood chair wood craft wood crafts wooden chair wood furniture yard

Blog at WordPress.com.

  • Subscribe Subscribed
    • Jean's Blog of Life, Farms and Everything
    • Join 45 other subscribers
    • Already have a WordPress.com account? Log in now.
    • Jean's Blog of Life, Farms and Everything
    • Subscribe Subscribed
    • Sign up
    • Log in
    • Report this content
    • View site in Reader
    • Manage subscriptions
    • Collapse this bar
 

Loading Comments...
 

    %d