

The hounds are in jail while we work and they are not happy about it.
Having laid tile with William, twice in our old house and once here, I knew all the ways it is possible to tile a room. A nice square room can start in the middle on a straight line, on the diagonal, or even on one end. Depending upon the space, it’s use and being careful not to tile yourself into a corner (which William had done once) there are lots of ways to tile rather than the time honored “start in the middle”. Deciding which way works best for the look, shape and use of the room is the hard part.
Our den tile, for instance, needed to be started at one edge. When the house was built there was an island of carpet in the center of the room. When we tiled that area, if we’d chosen “start in the middle”, it would have left funky long cut tiles along the edge. We needed a border on the angled edges of that space to make it look nice and not like an after thought. The long cut tiles are on the far wall and run slightly underneath the baseboard so they look more like normal, uncut wood planks. The cut tiles along that wall are also buried by a long bookshelf, a curio shelf and a cedar chest, whereas long cut tiles on the border next to the original tiles would not be a pleasing look at all.
When William was first deciding how to tile the bedroom, he had decided that the room was very off square. I am hoping he was wrong. When John and I measured corners yesterday, we found the room is a hair off square. Thus, we should be able to finesse some grout lines and bury a slightly uneven final edge, under the baseboards again. We could easily have chosen the start at one end and buried the uneven edge under the baseboard in back of the massive bed and night stands, but I thought that looking across the den and into the bedroom, the wood look tiles would look better if they ran in the same direction as they were done in the den island.
So, we began the room prep. A couple of years ago we bought a small flat rolling cart at Harbor Freight for about 30.00. We have used it to haul hay, bags of horse feed, huge potted plants coming in for the winter, boxes of tile and now it has even moved massive furniture. That cheap little cart has withstood it all and would have been a bargain at any price. I had previously moved out the book shelves so “all we had to do” was move several thousand pounds of bedroom set. There was no way I was moving the bed into the Addams Family Garage because I knew I’d never sleep on it again if it had rested with spiders and scorpions for more than about 5 minutes. There was one place in all the house that could accommodate a king sized Tempurpedic Mattress, that massive bed frame, an equally massive TV armoire and two matching night stands. The front door entry of course! We look like we’re preparing for a zombie invasion here, but it’s also a great reason to ignore door to door sales folks.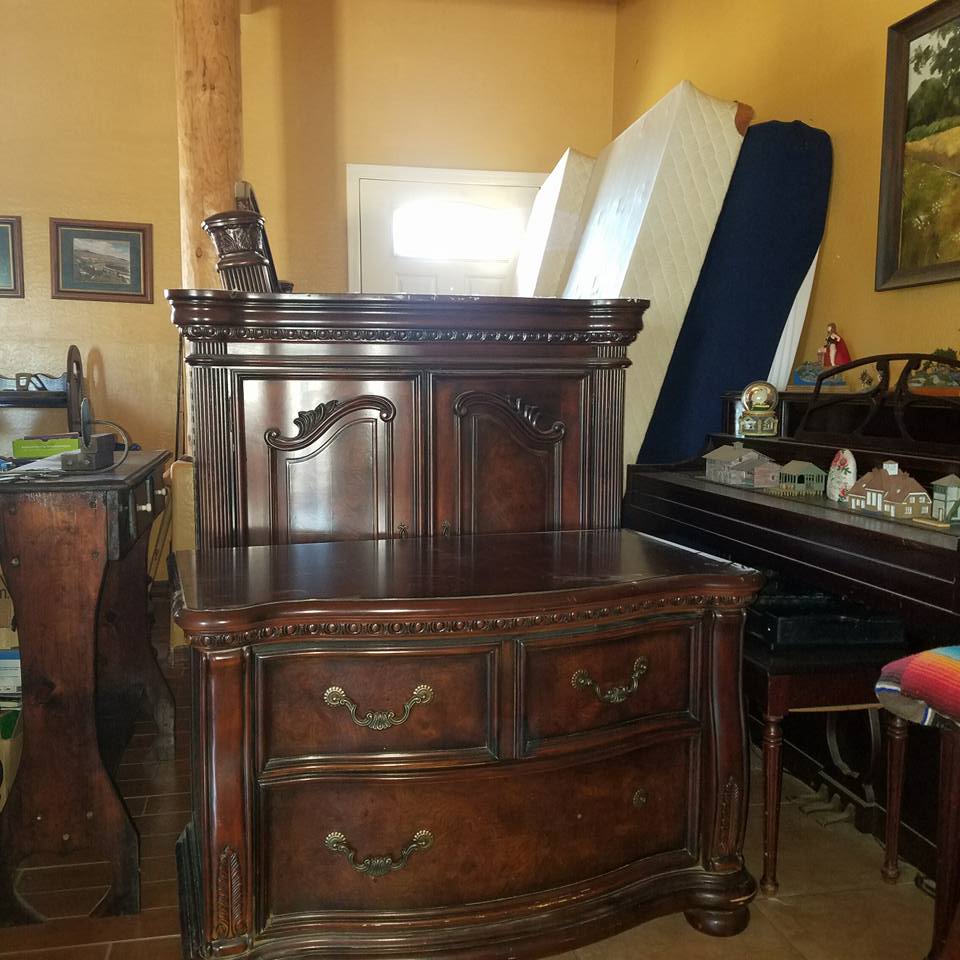
We positioned one end of the massive headboard (did I mention massive?) on our cheap little rolling cart, John held up one end and walked while I pulled the cart out into the den and into the entry. Somehow, without sending the cart through the glass patio door or the sheet rock in the bedroom, John managed to lower the top half of the armoire onto that same cart and we were able to roll it out as well. There were a few marked gasps in both of these endeavors but we made it through them with no damage to ourselves or the house.
Next, John had to trim the bottom out of the door frames in the room. A couple of years ago we had lusted after a power multi tool we’d seen at home depot. At the time, we were building all the patio and backyard furniture and we had plenty of power tools. While the multi tool was groovy, we didn’t think it would do anything more than our already large power tool collection would do. We were wrong. We should have gotten it. Then, because it was groovy, now because it would have taken John a mere few minutes to cut space under those door frames rather than the hour of blood, sweat and angst it took him to hack saw and chisel through the petrified wood on 3 door frames.
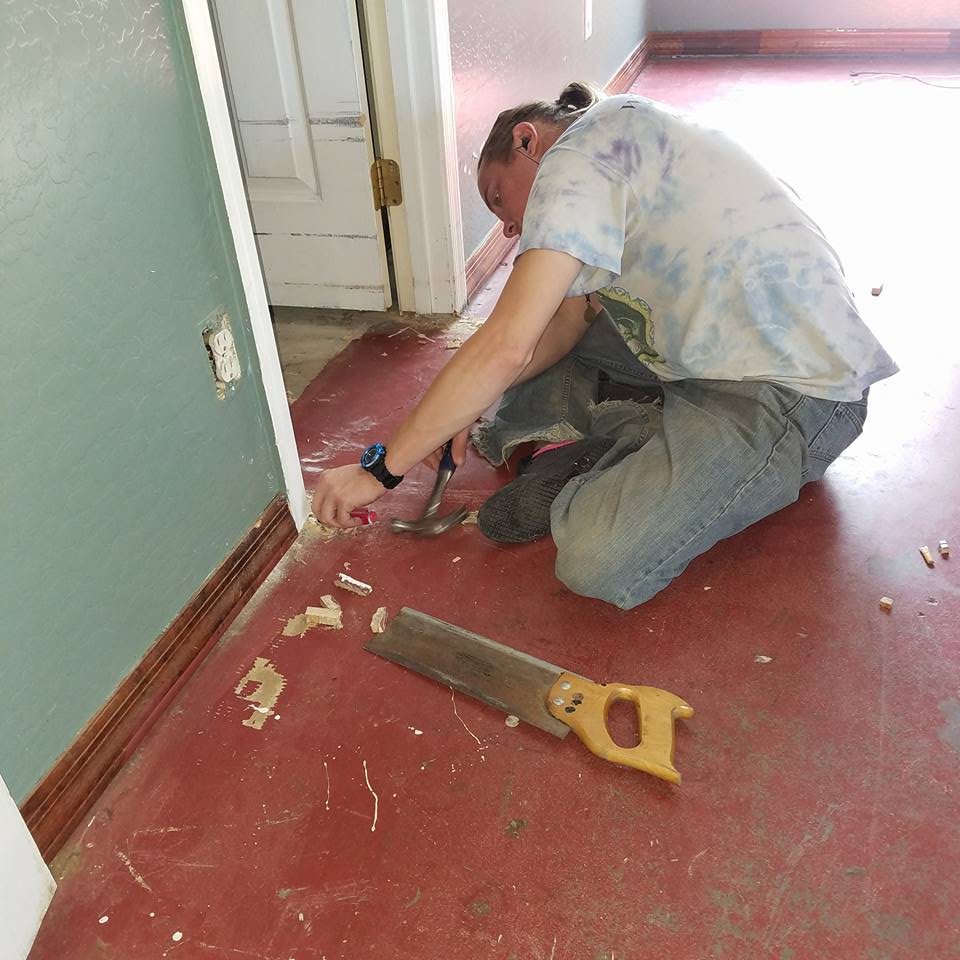
While John was hack sawing out the space under the door frames for the tile, I noticed that the builder had not bothered to do this where the original tile meets the bedroom door. He’d just run the tile straight to the door frame, cut around the frame and grouted that puppy in. Heaven help any future owner of this house who decides to replace the door frames. I hope they have a multi tool.
Next we measured the walls. There was one small oops made right at the start of measuring, which we were able to identify and fix moments later before tragedy occurred. The wall that runs perpendicular to the bedroom door was measured, and center marked. When we got to the wall opposite there was a full 8 inch discrepency. DOH! The bedroom door juts out about 8 inches into the room, thus, making that perpendicular wall 8 inches shorter. We simply added 8 inches to the measurement and re-marked the center. Day saved. We blame all that furniture moving and hack sawing for our momentary lapse, and believe me, it’s a reasonable excuse.
Chalk lines were made across the room, checked, rechecked and snapped in. Once again I thanked Billiam for collecting all our tools and undertaking all the projects I fancied over the years because we didn’t have to buy anything but the tile, grout and thinset. Although, that multi tool would have been fab.
We had gotten a wet saw years ago when we did our first tiling job at our old house. It lasted for over 16 years until my older son knocked it over in the garage. It still works, thank heaven, but it spurts a fountain of water at whoever has the tile cutting job (me, always me). For the first time ever, I am glad it is still hot in Arizona in October. By the time we put our tools away last night, I was pretty much coated in tile mud.
Clearing, sawing, putting the wet saw back together, vacuuming, measuring and marking took most of our day and we didn’t get started with the actual tile until about 4:00 pm. Like every thing else involving batter in Arizona, apparently thin set requires more water here. The instructions said “the consistency of peanut butter” and listed the amount of water to use. Using their instructions we came out with a consistency of peanut butter left open, in a freezer for about 10 years.
Also discovered soon after is that thin set in Arizona will stay at the consistency of peanut butter for about 30 minutes in it’s bucket. After that, we’d have to add more water and mix it up again, and then to a consistency more like peanut butter gravy. Today, the plan is to mix muuuch smaller amounts of thin set.
I think we actually laid the first row of tiles at about 4:30 pm, and with fighting the wet saw fountain and the thin set, we got a little over an 8th of the room tiled. John used his good knees and back to spread the thin set, lay the tile, put in the spacers and measure the cuts along the wall. I manned the putty knife to back butter the tiles for him, scrape up excess thin set, run the marked tiles out to the wet saw fountain, and then tried to keep the thin set finger prints and what not off the laid tiles. Between the two of us, we have a bang up job that Billiam would be proud of started. Today we hope to be able to move faster now that we have the system down.

we are working on one quadrant at a time to avoid tiling ourselves into a corner

The bedroom tile thus far.

Beautiful! I’m interested to hear your theory of tile laying in connection to rugs, room use, room location in the house, etc. Very good considerations for those of us still in the thinking stage. And so nice to know that relatively inexpensive tile can look so good.
There is, thankfully, only one room with carpet left in the house. When I posed the question “Don’t you want to rip up the carpet in your room and put down this tile?” he said, “I like carpet, keeps my feet warm.” This was after the conversation where he admitted he’d run screaming if any of his friends wanted help tiling their rooms.
We have never had to lay tile near a carpeted area, thank all the gods. I know what kind of mess we’d have made on the carpet.
If you’re talking about throw rugs or other area rugs, tile goes great with those. We have several large washable woven rugs on ours. Area rugs also help cut down the accoustic issues that tile can cause. If you don’t have dogs prone to dragging the rugs around <coughing DammitAmyNo), you can get rubber mats to keep the rugs from slipping on the tile. I've often considered duct tape, but Amy would just eat it.
From the guest bathroom to the far wall of my bedroom in an open floor plan home, there is a straight view of everything in between. When we laid the tile in the den area where the carpet used to be, the long edge butted up against the original tile and stretched over 3/4 of the den in a north south orientation. The tiles are entirely different except for being in the same color pallet so the den tile required a border, and that border had a lot to do with how we needed to orient the tile, but so also did aesthetics. Had we lain the tile in an east west orientation it would have appeared to our minds' eyes like a barracade. Laying the tiles lengthwise let the room flow easily from one end to the other. This could be handy if you want to mentally separate one section of a large room from another, but remember you'll be stuck with that room layout for a very long time. The same was true for the bedroom tile we are in the process of installing now. Looking south straight through the house, the tile flows through the den and will flow straight to the bedroom wall, even though the original tile butts up against the tile in the bedroom. The tile in the den is now the same tile we are installing in the bedroom and the flow between the two patterns is what catches the eye. If we'd lain the tile across, east to west, it would have seemed a mental brick wall going across to stop the flow between the two rooms.
That said, when William installed the wood laminate flooring in the office, the room is small and rectangular. It seemed, and still does, a better option to run the boards across the doorway. This enhanced the length of the room, gained no interference in flow from the original tile in the hall way. It simply would have looked odd to us.
While on the subject of laminate, I'll mention room use. We chose poorly when he installed the laminate. We should have simply gotten the tile. That room was the office and hobby room of a very large man. Dripped paint and such did damage, his rolling desk chair did damage and the shelf units did damage. Any furniture placed on it or which had to be moved across it, left marks. Anything spilled on it, goes down the cracks and eventually damages it. This is the only laminate I've ever dealt with so other brands or styles may be different, but I'd never use it again. Ceramic tile, however, stands up to all the abuse we can throw at it. We use this house and we use it hard. We've spilled an amazing variety of stuff on it. Paint spots peel up, I use oven cleaner on it once every year or two, we've dropped pots, pans, glasses, stoneware, on it and we have no cracks or chips in our tile (knock on wood). Of course, anything that hits it shatters, but the tile is fine.
Unlike carpet and probably that laminate, the downside to tile is that it is not easily ripped up and replaced. The original tile is a nondescript color that hides dust well. The color will go with anything we choose to put in this house. Just know that when you choose ceramic tile, the color matters. You might love one color or pattern in the store, but your walls, fixtures and furniture are going to also have to live with that tile. We have a lot of stained wood furniture and we even hand stained and finished the baseboards while the house was being constructed. Thus, the nondescript tile as well as the wood patterned tile work really well for us. I don't have to worry if I fall in love with a certain color bedspread, curtain, rug or wall color. Both tiles look great with all of it.
Interesting post!