• As Life Would Have It

Jean's Blog of Life, Farms and Everything

~ Welcome to life on our mini-farm in the AriDzona desert!

Jean's Blog of Life, Farms and Everything

Author Archives: Jean

The Great Gardening Experiment part 1.

27 Tuesday Oct 2015

Posted by Jean in Uncategorized

≈ 2 Comments

beautifulfood

Give a woman a zucchini and she’ll eat for a day.Give her seeds and chaos ensues.

In early June, in temperatures in excess of 105, in the middle of the AriDzona desert, John and I decided to attempt a garden. Well, okay, I decided to attempt a garden and John kindly did most of the work. We’re still trying to find ways to cut bills and earn extra money for living expenses. Ten dollars at the grocery doesn’t go very far. Ten dollars worth of seeds can, as it turns out, feed us for several months. “Fresh” vegetables from the grocery also don’t last very long. If I’m lucky, a week. More often than not, three days. Green onions, overnight. Frozen veggies were my diet.

I was on Facebook, as too often happens, when the sudden determination to garden struck. Someone posted a gardening question. I answered her question with another question, which led to other other people asking other questions, until a couple of gardening experts joined the conversation to provide tips, which led to Google, which led to a site called Native Seeds/Search which led to me sitting here tonight, blogging about the garden. Please tell me that happens to other people.

Because we’d only grown zucchini, once, in the backyard and had no luck with anything else we’d planted, I decided that heirloom seeds from vegetables developed in the southwest might offer the best chance for a successful harvest. Packets of three varieties of squash, corn, onions, and basil were chosen and excitedly ordered. Again, because I’d had luck with zucchini, I picked up a packet of zucchini seeds, a packet of white scalloped squash and a packet of pumpkin seeds. Another local gardener supplied us with seeds from her pumpkins, carrots, and parsley as well as several sweet potato slips. We bought a very inexpensive slow drip system at Home Depot and we were ready to begin the grand gardening experiment.

wholearea

Note the two halves of the garden with that nice alleyway down the middle.

We had a lot of 2x4s left from our furniture building spree, so we used those to box in two sides of a small corral rather than buying the traditional 4x4s. We’d had to sell most of the horses when Billiam became ill, so we put one of the now empty corrals to use as the garden. It was near a rarely used hose spigot and it had been in use by horses for 6 years and had a good buildup of fertile dirt. At the time we began the garden, we had no end of pony and goat poop and a kind chicken owner willing to bring us all the chicken poop we might want. Now, we have our own chickens producing poop, but that’s another adventure post entirely.We didn’t buy special soil or fertilizers because we had a fertile poo trifecta right here at home!

The problem we had when we were growing zucchini was the wildlife. Cottontail rabbits and ground squirrels devastate almost anything we try to grow, even cactus. John and I knew we had to deter the garden predators before we could begin to plant seeds. The little corral was fenced for ponies with steel rail fencing, covered with wire no-climb fencing, with a three foot tall section of 1/4 inch hardware cloth around the bottom to keep out rattlesnakes. This wasn’t going to work to fence out rabbits and squirrels so we picked up several rolls of chicken wire. This garden thing was an experiment remember. This was the first part of the experiment that failed.

We didn’t think to bury the bottom of the chicken wire, so the rabbits simply dug under it. The squirrels didn’t bother digging under, they just sucked in their little cheeks and slithered right through those 1 inch holes in the chicken wire. Back to Home Depot for smaller chicken wire. This time, John buried it a foot down all the way around except for the end of the garden that attaches to the walls of the barn. We’d deterred the rabbits, but the squirrels dug trenches under the stall walls inside the barn and mowed down the sweet potato slips and the pumpkin slips we’d been given. Deterrents alone would not work. We were forced to engage in rodenticide.

Once we had cleared out the ground squirrel populations nearest the corral, we replanted more sweet potato slips, a pumpkin slip, replaced all the seeds the squirrels had dug up and planted the I’itoi’s Onion bulbs I’d ordered. That’s when we discovered we also had a bird problem. I thought I had gotten poor quality seeds until I planted the onion bulbs. Every day for two weeks I’d go check the garden for sprouts and find no sprouts, then I began finding onion bulbs laying all over the garden. There wasn’t a squirrel moving on that entire corner of the property, the rabbits could only gaze longingly through all the fencing at those sweet potato and pumpkin leaves. I thought perhaps mice or rats so I set a few traps out in the dirt near the onions and caught a bird. A bird with divining capabilities because it knew precisely where the seeds were buried and gorged on them. I guess he/she didn’t like onions so just pulled up the bulbs and tossed them aside. Up until then, I thought the nice birdies were just keeping the garden safe from bugs. HA!

We put up pin wheels to scare the birds. Those worked an hour or two. We left the traps out, and that seemed to let them know we were serious. The traps made us feel awful though so, thanks to another Facebook suggestion, we covered the onions and replanted seeds under tents made of leftover chicken wire and bits of hardware cloth. That finally did the trick and by late July, eight weeks after starting the garden project, the seeds were sprouting, the vines were spreading and all we needed was razor wire and spotlights to make the garden look like an exercise yard at a penitentiary. This is when I started learning about heirloom squash.

Recall please, that all I’d grown were zucchini. Zucchini is a squash. It grows in a sprawling bushy style. There isn’t much information on the interwebs about the heirloom squash I grow because very few people remember they exist and even fewer people grow them. The packets told me a little of their history and what they looked like when mature. I planted two zucchini, one yellow squash, one white scalloped squash and two or three each of the heirloom varieties. As the heirloom squash plants sprouted and grew, I learned that not all squash grow in a sprawling bushy style. Many, if not most, vine like mad. At one end of the garden, I had three pumpkin plants happily taking over a 20 foot area (I knew they vined, I just didn’t know how much they vine and I had planted three). At the opposite end of the garden, nearest the barn, I had 6 to 8 heirloom squash vines attempting to take over everything else.

Garden9915
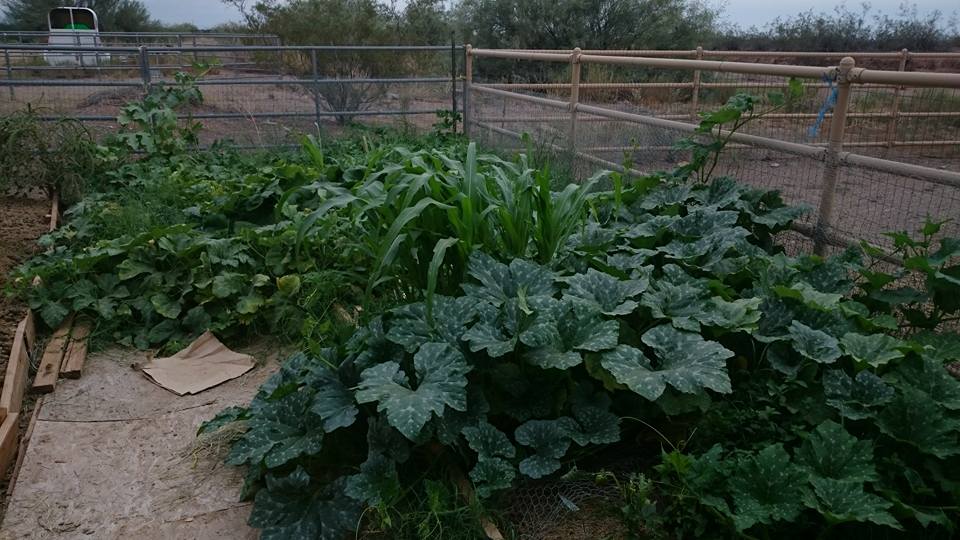
Note the vines escaping over the fences and the diminished alleyway.

The corn I’d replanted and carefully covered with chicken wire, was struggling to survive in the shade of giant squash and pumpkin leaves. Every day I’d go out to check the garden for poachers, rearrange vines and pull vine tendrils out of the wire tents. I finally gave up and planted a new row of corn and gave up the basil for lost. The original corn and it’s wire tent are now buried beneath the sweet potato vines, pumpkin vines and the squash vines that weren’t happy with just their end of the garden and which are now mingling with the pumpkins and potatoes. This mingling of vines presented yet another unforeseen problem I will describe later in the garden chronicle.

This saga will be continued in a day or so.

Share this:

  • Share on X (Opens in new window) X
  • Share on Facebook (Opens in new window) Facebook
Like Loading...

DIY Cabinet Door Chalkboard Success!

15 Sunday Feb 2015

Posted by Jean in Home Decor

≈ Leave a comment

Tags

cabinet doors, DIY, do it yourself, home decor, homemade furniture, upcyle cabinet door, wood craft, wood crafts

chalkboardworksIt’s very easy to draw and write on and the chalk comes off with a very slightly dampened microfiber cloth! I love simple successes, even though my mishaps make better stories later.

Here’s a link to the original post.

https://azprancingponyfarm.com/2015/02/08/make-a-chalkboard-out-of-a-used-cabinet-door/

Share this:

  • Share on X (Opens in new window) X
  • Share on Facebook (Opens in new window) Facebook
Like Loading...

Front Porch Chair

09 Monday Feb 2015

Posted by Jean in Home Decor, Wood Crafts

≈ 1 Comment

Tags

DIY, diy chair, do it yourself, home decor, homemade furniture, outoor furniture, wood craft, wood furniture, wooden chair

I finally got out of the house today. I’ve been trying to get the house fully in order where it can pretty much stay fully in order. This, however, is a long process and is about dull as dishwater. I’ve been itching to get outside and build something, ANYTHING.

A couple of months ago I decided that the front porch needed a table and a couple of chairs. The big back patio faces west and is just too hot to enjoy for about 5 months out of the year. Once the sun moves over the house, the back patio starts heating up and I could bake stuff out there by 3:00pm. Gosh knows John and I have baked ourselves pretty thoroughly out there trying to get projects done last summer. Thus, the front porch will be our go to spot for bbqs and such. I can even clean up the old grill and put it out there. Add a few plants and make it a spot I’ll actually remember to use. I’m pretty sure the front yard landscaping would appreciate it if I remembered it more often.

I had John cut the wood for the chairs back when I thought of this project, but then got side tracked by an intense month of house keeping and organizing. The past two days have been so beautiful that I just could not stand to work in the house again today. I needed sun, blue sky and creativity before I went berserk.

Here are the cut pieces of 2×4 for two chairs. Right where they’ve been sitting for over a month.

woodcutsYup, the cute work table we used all last summer before we finally painted it and made it a part of our patio decor is being pressed into service as a work table again.

I pre-drilled pocket holes in the chair back boards, front apron, side boards and support board. While doing this I had the first inkling of problems caused by not getting around to doing this for over a month. The wood was damp and devilishly difficult to drill because the bit kept getting clogged. I finally got it done though and began putting the chair together.

This is where I noticed problem number 2. I had disregarded my rule of using lumber within a day or two of purchase. No matter how straight a construction grade 2×4 is when you buy it, it can warp, bow and twist while waiting to be used. I had actually thought of this and had John go ahead and cut the pieces the day after we brought them home. Then I put off building the chairs, thinking the cut pieces were too short to bow, warp or twist. Wrong.

The job was more difficult than it had to be, but it’s rustic right? Rustic is a great rationalization.

buildingbackClamping the back boards to one back leg, the job was fairly easy until I had to attach the second back leg. That’s when I noticed slight twists in those tiny short 13″ boards. This would mean that I could line them up perfectly with the 2nd back leg but the twist in the short back boards would make the leg slightly crooked. Rustic. That’s the ticket.

chairbackNext on the assembly list is the chair front. The front apron wasn’t too deformed so attaching it to the front legs was ungainly, as usual, but not difficult.

chairfrontOnce the front of the chair was built and I leaned it up against the back I noticed problem 3. The plans were off by about 1/2 inch. The lowest back board, back apron board, was 1/2 inch higher than the front apron. Not quite enough slant to slide a guest onto the ground, but enough to make them feel like they would. The back apron had to be unscrewed and moved down so that the seat would be level.

Then it was time to add the side boards. The plans said to attach the side boards 1/2 inch from the outer edge of the legs. I measured and marked the spots. These boards also needed to be attached flush to the top of the front legs and even with the top of the back apron.

chairframeVoila! A chair frame. This was when that slightly crooked back leg began to neener me. Because that one back leg was slightly crooked, the chair wobbles slightly. Rustic. That’s what it is.

Next it was time to screw in the extra seat support board. This board needed to be attached flush against the back apron board, between the two side boards. It didn’t fit. It was, guess what, about 1/2 inch too long. Either the side boards needed to be removed and attached at a little less than 1/2 inch from the edges of the legs or the support board is going to have to be cut again. These are 2x4s. No one is going to fall through them. I’ll recut that support board at some point, but not today dammit.

Next, the three middle seat boards needed to be attached to the front and back aprons. You have NO idea how joyful I was when all three boards fit neatly, and without argument, through the opening in the back. If that measurement had been off I might have just had a bonfire at that point.

Next it was time to add the side seat boards. This is where that slightly crooked leg gave me a full on raspberry. One side seat board was lovely and even with the three middle seat boards. The other, not so much.

chairWe have a jigsaw. Nuff said.

Once the other chair and the table are built, we’ll sand, putty and paint. For all it’s issues, it’s still a cute chair! You can find the plans for it here: http://www.morelikehome.net/2012/10/day-4-build-simple-chair-with-2x4s.html

If you build this chair, it might be wise to build the front of the chair first. This way you can be sure that the back apron is attached at the same height as the front apron. Also, before attaching the side boards, place the seat support between them and mark where the outer edge of the sides strike the legs.

 jailedagainThe dastardly dachshunds were jailed by the open back door. They just don’t understand why their help is not appreciated.

Share this:

  • Share on X (Opens in new window) X
  • Share on Facebook (Opens in new window) Facebook
Like Loading...

Make a Chalkboard Out of a Used Cabinet Door

08 Sunday Feb 2015

Posted by Jean in Home Decor

≈ 6 Comments

Tags

cabinet, DIY, do it yourself, home decor, wood craft, wood crafts

This is so easy it’s almost embarrassing to post it. Almost. There are still folks out there that have not picked up on the many wonders of used cabinet doors. If you’ve read my blog, you’ve seen me turn them into serving trays, a tech cabinet, an outdoor planter, and even a patio storage bench.

Last year I scored a pickup load of used cabinet doors for about 1.00 each. They came in various sizes and widths and the fellow I bought them from even threw in a 5 gallon paint bucket filled with hinges for them. Those I found on Craig’s List, but since then I have found that every Habitat for Humanities ReStore I have visited has a selection of these gems as well for only 2.00- 4.00 ea. depending on size. STILL a bargain because I am highly likely to run out of cabinet doors long before I run out of uses for them.

I have finally recognized a need for a chalkboard. Not enough of a need, mind you, to paint an entire wall or back splash with a writing surface, but a need for a larger reminder than sticky notes provide. I chose a 16 and 1/4 x 21 and 1/2″ cabinet door from my pile. (This is also a good size for a large serving tray.)

Because I like the rustic look and because I’m quite fond of green, I used a Hunter Green spray paint and gave the cabinet door a light coat all over. This allowed the wood tones to show through.

paintcabinetdoorNot into the rustic look? Not a problem. Choose what ever color you wish and use enough coats to completely cover up the wood. You’ll need to let each coat dry thoroughly before applying the next.

I then taped the “frame” of the door to make it easier to roll on the chalkboard paint without worrying about getting it all over the edges.

tapecabinetdoorI have a quart of Disney black chalkboard paint. You can get other brands and other colors. I also found a site that says you can DIY your own chalkboard paint in a treasure trove of colors using non-sanded grout mixed with semi-gloss latex paint in whatever color you wish! For those of you that want to paint an entire wall, this would be a more economical option: http://www.houzz.com/ideabooks/3454588/list/diy-make-your-own-chalkboard-paint.

You’ll need two coats of the paint rolled on with a small paint roller. The first coat must dry at least 4 hours. I simply let mine sit over night and finished up the next morning. However, you could roll on one coat in the morning and the 2nd in the afternoon.

2coatschalkboardpaintOnce both coats are dry, run a utility knife under the edge of the tape to prevent any of the chalkboard paint from peeling up as you remove the tape.

letcure7daysWAIT! Don’t grab your chalk! Now that both coats are dry and you have removed the tape, the paint has to cure for 7 (SEVEN) days.

I’d love to tell you how well this worked, but I’ve got 6 days to wait 😉  Next Saturday I’ll scribble out a message for you.

Share this:

  • Share on X (Opens in new window) X
  • Share on Facebook (Opens in new window) Facebook
Like Loading...

January Cure Final Week and Stuff Happens

07 Saturday Feb 2015

Posted by Jean in General Farm Stuff, January Cure

≈ 2 Comments

Tags

DIY, do it yourself, home decor, January Cure, pallet, wood craft

The final week of the Apartment Therapy January Cure and I was IN THE ZONE boy. Over the weeks, I’d organized, polished, cleaned, dumped, and managed to keep the house that way. I was on a rampage. I could see the finish line!

The final big weekend project was the living room. Mine is all part of one big room comprising the kitchen, a dining area and living room. With the kitchen sparkling, my desk organized, and once the dining table was cleared off, there really wasn’t much left for that room. I keep it dusted and picked up because it’s where all visitors land. My long bookshelf/plant stand by the picture window needed attention, but other than that, the room was good to go. I figured 3 hours tops would take care of it. Thus, I commenced with the before pictures.

bookjumblediningroom(That mess was NOT my fault. My son needs to set up a drop zone of his own, in his room instead of using the table as a drop zone. The dastardly rug rumpling dachshund duo need to… well nothing I can do about them except continually straighten rugs.)

livingroom1(No, we’re not protecting the living room from alien brain sucking waves. Aluminum foil works like dastardly dachshund kryptonite to keep them from jumping on and off the furniture. Yes, this is my life.)

So, a couple of hours work should have handled this. I could get more things done than just the living room like continue work on the laundry room and add a single shelf in my bedroom to replace the sad little faux wood bookshelf that is no longer needed. I was confident. Too confident.

Friday, my son and I went to town to pick up a board and a couple of decorative wooden corbels. I had a couple of other errands to run and we stopped in at a Sonic Drive in to grab lunch to take home. That’s where the demise of the weekend began. My son and I have done so much DIY wood working over the past year, that we cannot see a pile of wood without stopping to gawk and dream up ways to use that pile of wood. Well, that very Friday morning that very Sonic drive-in was doing some remodeling and had piled a whole mess of wood in one of the parking slots. We just HAD to ask about it and early Saturday morning we were back with a big trailer.

freewoodThat is a 15 foot trailer. We filled it.

It looked like a lot of wood in the parking slot. It was even more than we thought. It was also heavier than we thought. The winch on the trailer proved to be non-functional so John had to haul these LONG pallets up onto the trailer manually. I can lift, but I can’t carry. All I could do to help was lift and shove from the back, while John dragged from the front. Nothing, at least for us, is as easy as it first appears. Which should have warned me about the rest of the weekend.

I, and this WAS my idea, decided that the easiest and fastest way to unload these mega heavy long pallets was to chain them to the tractor, haul them off the trailer and drag them to a designated “stuffwewillprobablyuse” pile next to one of the corrals. It sounded like a good plan.

My tractor in a memorial to my hubby

tractorandstarsMy tractor is a 1957 Ford 800 series. Thank goodness. I’m not sure if some shiny new green monster would have had a sense of humor about what we did. Because she’s a mature girl (old), she pretty much demands fresh gas if we haven’t cranked her up in a while. We thought we had some. One gas can was empty but the 2nd can was near full (“2nd can” should have been a damned good clue for me, but I wasn’t paying attention and we were rushed for time) and John poured about a gallon into the tank, way more than enough to do this job but I figured I’d drag down some weeds around the property when we were done with the wood.

We tried cranking the tractor, she was reluctant. Very reluctant. Only with a LOT of coughing, sputtering and a cloud of smoke… wait.. I don’t remember her smoking before? But she eventually started. I backed her out into the middle of the backyard, John positioned the truck and got the chain attached to the pallets. I put the tractor in gear to haul the pallets off the trailer and the engine conked out. Starting efforts proved fruitless and drained the battery. This meant we had to move a car around to charge the battery. Starting efforts remained fruitless which meant we had to call a neighbor over for advice. It was while awaiting the arrival of the neighbor that my brain coughed up an old factoid. Wasn’t there a can of old boat gas in the garage? “JOHN? What was in that gas can you put in the tractor? Was that boat gas?” “Dunno.” facepalm. Boat gas, requires added oil. Tractor engines don’t appreciate oil added to their gas. This would explain the smoke. This would also explain the dark blue colored gas my neighbor found in the sediment cup.

The neighbor, kindly, chained the pallets to his truck and we did get them unloaded. He didn’t laugh. Much. The remainder of Saturday (not much left of it by then) and most of my Sunday were spent adding small amounts of good fuel to the tractor, and then draining out the oiled fuel over and over and over because, of course, the tractor had quit on a slight hill and wouldn’t fully drain. The best we could hope for was to weaken the mix enough for the tractor to start. As I said, thank goodness they made tractors the way they did in 1957. I was born the year before this tractor and I’m thinking it’s not a coincidence that they made my tractor well enough to stand up to me. They saw me comin’. The tractor finally cranked up Sunday afternoon, although her gas is still faintly bluish. Bless her.

This incident was followed by two days of rain, the discovery of a leak in the ceiling over my kitchen sink, running errands for my heroic, engine expert neighbor’s wife, and then post rain clean up of the barn and corrals (yes, the tractor is still running). My entire final week of the Cure was shot. However, I did manage to clear out and organize the bookshelf, vacuum it thoroughly (including the books) pitch the old non-working stereo and untangle all the plants that had gotten so happy they’d started moving into each others pots. My son also cleared all his dropped items off the dining table which is now, serving as a temporary surface for a craft idea I decided to work on yesterday so it’s still non-functioning as a dining area.

As for my laundry room and that shelf I was going to build in the bedroom, well, to quote Albus Dumbledore after working up the courage to try a Bertie Bott’s Every Flavor Bean, “Alas, earwax”.


Share this:

  • Share on X (Opens in new window) X
  • Share on Facebook (Opens in new window) Facebook
Like Loading...
← Older posts
Newer posts →

Posts, stories, woes, vittles, photo and video evidence

Categories

Enter your email address to follow this blog and receive notifications of new posts by email.

Join 45 other subscribers

Current woes, tall tales, and lessons learned

  • Here are the mutts.
  • January Cure 2018- Flowers and Floors and Stuff
  • January Cure 2018 Day 2- Make a list
  • January Cure 2018- Day 1- Clear and Organize a Drawer
  • January Cure 2018: But first a word from our sponsor
  • January Cure Weekend 1- Flowers and Floor
  • Day 3 January Cure 2017- Purge the Pantry vs Cabinet Cleanout
  • Day 2 January Cure 2017- Making a List (humming- checking it twice)
  • January Cure 2017 Day 1
  • Billiam’s List Bedroom Tile: Pat us on the head!

Tags

cabinet cabinet doors chickens cleaning cleaning house cleaning stainless death of spouse desert gardening DIY diy chair do it yourself dreams of dead spouse easy bedspread easy cotton bedspread egg bound farm floors garden garden bed gardening grief hanging bed heirloom squash hens home cleaning home decor home furniture home improvement homemade furniture home organization horse house cleaning how to handle grief how to hide cord clutter how to make serving trays January Cure January Cure 2016 January Cure 2017 January Cure 2018 landscaping mayo arrote miniature horse no sew bedspread off road wheelchair organic gardening organizing ottoman outdoor furniture outoor furniture pallet patio patio chair patio furniture pumpkin serving trays squmpkin storage bench swinging bed TankChair tank chair tech storage tie-dye tie-dye bedspread to-do lists tools tracked wheelchair tree trimming upcyle cabinet door upholstery wood chair wood craft wood crafts wooden chair wood furniture yard

Blog at WordPress.com.

  • Subscribe Subscribed
    • Jean's Blog of Life, Farms and Everything
    • Join 45 other subscribers
    • Already have a WordPress.com account? Log in now.
    • Jean's Blog of Life, Farms and Everything
    • Subscribe Subscribed
    • Sign up
    • Log in
    • Report this content
    • View site in Reader
    • Manage subscriptions
    • Collapse this bar
 

Loading Comments...
 

    %d