• As Life Would Have It

Jean's Blog of Life, Farms and Everything

~ Welcome to life on our mini-farm in the AriDzona desert!

Jean's Blog of Life, Farms and Everything

Author Archives: Jean

Busted Bullnose Corners- Billiam’s List

10 Thursday Apr 2014

Posted by Jean in Home and other Repairs, Uncategorized

≈ 1 Comment

One of the first projects I tackled on Billiam’s List, was repairing the dented, scarred and popped out bullnose corners in our house. Our 6-pack a day builder had not bothered with screws, he’d just planted the corners in sheetrock mud and painted over them. Of course, within months they’d pulled away from the dry wall in spots, if we banged them with anything at all they’d dent and pop away from the wall quite a lot. When we thought about what to do about them, all William could think of was to replace them entirely and this seemed a bit daunting at the time.

bustedbullnose1

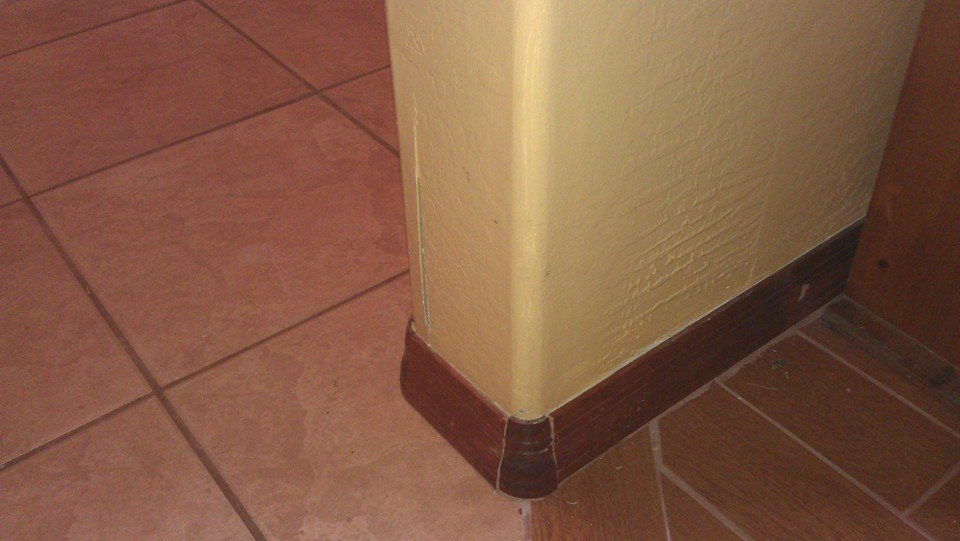
After the memorial service was out of the way, I’d given a bright white coat of paint to most of the doors in the house and needed to line up another project quickly to continue keeping my mind, heart and hands busy. The fresh new paint seemed to highlight the horrid looking wall corners throughout the den (we’re talking every corner), so I started the Google search for replacing bullnose corners to see if it was something I could handle. That search led to finding out that people actually repair that stuff and don’t try to replace it unless it’s absolutely beyond all help. Who knew? Well, you likely did, but I didn’t.

The fix would require a bucket of sheetrock mud, a can of spray on texture, a putty knife, sand paper and matching paint. I had the putty knife. All I knew about the paint was that it was called Apple Butter. I’d bought it three years before when I repainted the house while William was in the hospital having tandem bone marrow transplants as treatment for his Hodgkin Lymphoma. I needed walls I could wipe with disinfectant to keep the house as germ free as possible. Lesson 1., Many, if not most, people probably know this but I did not. The big home improvement stores regularly retire their paint colors, every year to two years. This practice basically forces us to repaint entire rooms every year or two in order to keep them looking neat (unless you don’t bang into stuff, have ill behaved pets, and don’t leave finger prints) Because I knew the name of the color and the brand, the store was only able to tell me the paint had been discontinued and if they mixed it, it probably wouldn’t match the wall color. I had them mix a sample, took it home and painted over a couple of small scratches. It looked perfect so I had them mix up a gallon. Lesson 2., was learning that I should have waited a few days for the scratch test paint to cure to it’s final color.

Thinking the paint was a match and having collected the other supplies, I began on the frightening project of making the bullnose corners look even worse so that I could repair them. Taking the putty knife I scraped all of the old paint and texture off of and away from the damaged areas.

bustedbullnose2

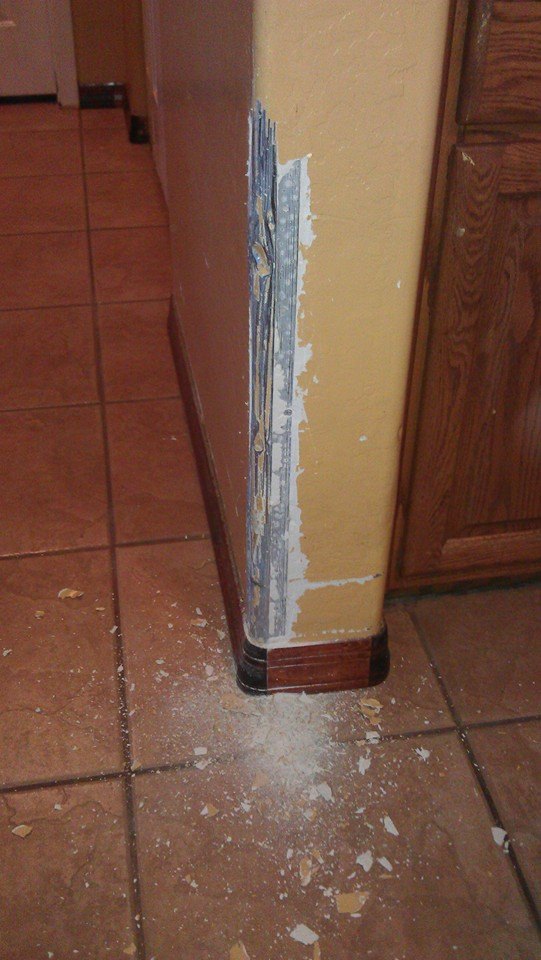
The point of no return, knowing that this could easily end up being an uglier aggravation than the dented, buckled and scarred corners had been. Once this part was finished on eight (8) corners. I quickly proceeded to the next step, mostly driven by the terror of “oh my lord what have I gotten myself into this time?”

bustedbullnose3

First I used drywall screws to actually screw the damaged sections back into place and keep them there firmly. Using a small hammer, I carefully tapped the dents into as close to their original shape as possible. Next, I began applying the drywall mud. This part took me a lot longer than it took the guys in the YouTube videos, mainly because, again, driven by terror, I was afraid it would be more of an eyesore. Thus, I applied, scraped, applied, eyeballed from all angles and smoothed until the mud was on the corners and the corners were as smooth and rounded as I could get them with a putty knife. After the mud dried, I used a damp rag to smooth it out more and finally used a light grade sand paper to finish. The texture spray was almost my undoing. I never could get it to match the original wall texture but did get it to a point to where I could say “If anyone gets close enough to that to notice and tell me it doesn’t match I’ll just shove their nose into it.”

Once the texture had dried I painted. That’s when I noticed that the scratch test areas I’d painted three days before were a bit darker than the wall color. “Is that the color or is that a shadow? It’s just a shadow. No, it’s the color. No can’t be. Damn.” There’s only one area where the newer non-matching paint is terribly noticeable and, of course, it’s the area that is right out in front when people come in the front door. Heck with it, that’s a small wall, I’ll paint it the whole wall with the new paint one day and no one will ever know.

bustedbullnose4In spite of the non-matching texture and paint, the repaired corners look great compared to their badly damaged state. The issues are small and while the slightly darker paint color does provide an irritation when I roll past, it’s a mild irritation in the greater scheme of things that I can make better when I get a round tuit.


Share this:

  • Share on X (Opens in new window) X
  • Share on Facebook (Opens in new window) Facebook
Like Loading...

Billiam’s List Patio Furniture

08 Tuesday Apr 2014

Posted by Jean in Uncategorized, Wood Crafts

≈ Leave a comment

Tags

DIY, do it yourself, home furniture, ottoman, patio furniture, storage bench, wood craft

My husband was a big man. He was 6’4″ tall and weighed 300 lbs.  We wanted nice patio furniture, but couldn’t find a thing that we thought could handle over about 200 lbs. We decided we would have to build our own and that project went on his To-Do list. We had built shelves, we’d stained and installed our own baseboards and we’d built our own storage chest ottoman. We’d built them together, but he was always the brains, strength and know-how behind each project.

I decided to tackle one of the building projects he’d wanted to do and my son, John, and I made another storage chest ottoman, using the old one as our guide, for the den.

IMAG1082

After we got that basic box and lid figured out, we got cocky and started making plans for all the great furniture we’re going to build. I also started looking at Craig’s List for less expensive materials because even though building that ottoman was less expensive than buying a good quality one, it was still too expensive for me to continue buying all the materials at Home Depot. I checked Craig’s List twice a day for 3 days before an ad appeared. An elderly man was selling a side yard full of all size lumber for 60.00. Soon I had a side yard full of lumber in my pick up truck and on the way home. While we were making plans for that lumber, another ad appeared on Craig’s list. This time a fellow was selling used cabinet doors 2.00 ea. I took one look and called. Came home with a pickup bed completely jammed full of oak cabinet doors of varying sizes. With some of the smallest doors I made this planter box.

cabinetdoorplanterdoneFirst I sanded the old cabinet finish off, then painted with green house paint on the frame, painted with Behr Apple Butter paint on the insets, then sanded over the whole thing again to expose some wood. Then I went over each door with Min-Wax Espresso stain and let it soak in for about 10 minutes before thoroughly wiping the stain off. After that cured and dried I applied 3 coats of Spar Urethane to hold up in the AriDzona heat and sun. We put casters on the bottom so we can easily roll it out of the way or into a different spot after it’s filled with wet dirt and plants.

Then we got really cocky and decided it was time to try building a storage bench. We used the same paint/stain technique and used larger cabinet doors. This required a little thought because we were trying to build the bench to fit the cabinet doors, so none of the online plans we had found earlier on were useful to us. We plan to build at least one more of these benches. They will have cushioned tops, much like the storage chest ottoman, but the cushion and cover will have to be of weatherproof materials. We believe we have a handle on a brilliant weatherproof cushion cover (brilliant in all ways, including cheap to free), but need to find an inexpensive source of mildew and mold resistant foam. See the post about the Techno-clutter for another great use of the reclaimed cabinet doors and lumber.

storagebenchThe other project we’ve done so far for the patio is a coffee table made of four inexpensive craft store crates and a square of reclaimed plywood. I stained the crates with Mission Oak stain and gave them 2 coats of Spar Urethane.

cratecoffeetablefinishedI still have oodles of wood and cabinet doors left. Plenty for another bench, a picnic table, a surround to hide our messy bbq grill, several more planter boxes, a nice wooden bench with a back, and several other projects that are rumbling around in the back of my mind. All for about 160.00 thanks to Craig’s list, some elbow grease and ingenuity.

Share this:

  • Share on X (Opens in new window) X
  • Share on Facebook (Opens in new window) Facebook
Like Loading...

Who am I now?

07 Monday Apr 2014

Posted by Jean in Grief, Uncategorized

≈ 1 Comment

Tags

death of spouse, grief

Everything changes, including us. One year we’re one thing, next year or ten years later we’re something quite different. Once I was a wild child, next I was a struggling single parent totally unhappy with where I was both geographically and socially, next I was a wild spirit, unfettered, a sponge soaking up nature and formal education, strong, creative, full of joy over simple things like watching a friend’s deft, graceful hands as she mixed and kneaded frybread dough.

Then I fell in love and moved to Arizona. Still strong, over-flowing with love for my husband and utterly joyful at simple things like making sure he had a good dinner in the evenings, treating him to breakfast and coffee in bed every day to make it easier for him to get up for work, a kiss and a wave goodbye every weekday morning to let him know how much I loved him. I was, at first, convinced I could still be the self sufficient, strong, nature worshipping woman I’d been when we fell in love. This city couldn’t beat me down I thought, and I tried, over and over again, to find some part of this new place where I could just be me.

I would haul the boys out into the desert to see cactus, rocks, or pick prickly pear fruit for jelly. These jaunts became amusing memories but they weren’t terribly amusing until the broken foot healed and all the prickly pear thorns worked their way out of my skin. I tried to find poetry in the desert that others told me about, it’s austere beauty, but all I have ever seen here reminded me of the desolation of Smaug (from the book, not the movie), “The land about them grew bleak and barren, though once, as Thorin told them, it had been green and fair. There was little grass, and before long neither bush nor tree, and only broken and blackened stumps to speak of ones long vanished. They were come to the Desolation of the Dragon, and they were come at the end of the year.” Tolkien, The Hobbit

The one place I could find my free spirit again was at a local lake. Every summer I would wade out into the lake where, buoyed by the water and smiled upon by an immense blue sky, I would fish at least once a week. Between finding a rattlesnake had curled up in the shade of my folding chair, while I was in it, and the time the boys came across one and decided to “play” with it while I was fishing, my days at the lake came to an end and I began staying home.

I planted things, watered things, redecorated the kitchen, tried a great many crafts, and continued to try and keep the home front a happy place for William at the end of his stressful workdays. We finally moved out of the city and built a home on a couple of acres. This meant a long commute, but he enjoyed having the time to adjust his mind between work and home and he absolutely loved the little farm. I enjoyed it because I had more space to breathe and recreate myself, turning toward that vital part of me that requires a large amount of sky, no traffic noise, and a pool where I could water the roots of my spirit. When a spirit is as drought stricken as mine was a swimming pool is quite a good enough substitute for a lake or stream.

I threw myself back into my lifelong love of horses and collected a barn filled with ponies of all colors. I enjoyed the colors of the desert sunsets, enjoyed the ponies and lived for the evenings and weekends when William came home and my love and joy with him would remind me why I was still here. But he’s gone, and after 18 years, I find it’s not so easy to reinvent myself, to find what I packed away upon moving here and to bring to life what the pointed, poisonous and desolate desert has dried up inside. This is the vital task that must take priority over all the problems I’ve been left with. Without finding my self, my strength, my spirit, my stubborn hard headed soul, and my joy in nature, the problems and the grief will never dissipate and will compound. William planted me here and did his level best to nurture me, I have to find a way to bloom.

In the words of Kurt Vonnegut “Who am I this time?”

Share this:

  • Share on X (Opens in new window) X
  • Share on Facebook (Opens in new window) Facebook
Like Loading...

Utility companies believe the earth is flat and you fell off the edge.

29 Saturday Mar 2014

Posted by Jean in Rural life

≈ Leave a comment

We moved 15 miles outside of town. Now, when we were living inside town it took us 15 minutes to get to the nearest grocery due to traffic, lights, pedestrians, etc. It still takes us 15 minutes to get to the nearest grocery 15 miles away because unless someone is trying to move a house with a pint sized pickup and a fork lift (yes, this has happened), there is no traffic and most of the trip is on a highway. In spite of the fact that it takes as long to get 5 blocks in town as it does to get 15 miles outside town, once you move to an unincorporated area you have essentially fallen off the edge of a flat earth as far as the utilities are concerned.

Along with the waits on various aspects of construction due to weather, schedules, Coors and such, we also had to wait for the various utility companies to show up to check wiring, trenches for wiring, connections for wiring, boxes for wiring, changes to the main box a mile away, changes in the substations, and waiting for the surface of the flat earth to extend to encompass our property. Each tiny step forward with phone wiring and electrical wiring required a wait for some sort of check or inspection or work elsewhere. This would have ordinarily been a good thing due to the heavy Coors consumption on the part of the fellow in charge of actually building much of our house. I know I certainly felt better knowing that a utility company employee had to go behind our builder (not picking up empty cans mind you, we had to do that later) and make sure no previously installed lines were trenched through, lines were installed where they were supposed to be installed (well, they missed one which irks me to this day), and the boxes were wired correctly (perhaps they’d started sharing the Coors by that time). Unfortunately, we moved out into undeveloped desert, which meant we had some pretty nasty wildlife residents who were here first, staked their claim and weren’t about to give up that sunny spot just because there was a patio on it now. I needed to be able to dial 911 if necessary.

All told, it took almost 8 months to get a telephone, Quest didn’t care about our rattlesnake problems, and 8 years later the service still isn’t the best even though there are several thousand more families living out here at the edge of reason and thought. I shouldn’t complain, it took 6 years to convince the post office to deliver mail to my house at the end of a gravel road because the mailman hadn’t bothered to look around a mesquite tree to see that the road continued another 1/4 mile. More on the mailman later.


Share this:

  • Share on X (Opens in new window) X
  • Share on Facebook (Opens in new window) Facebook
Like Loading...

How to Hide Technoclutter

28 Friday Mar 2014

Posted by Jean in Wood Crafts

≈ 2 Comments

Tags

cabinet, DIY, do it yourself, how to hide cord clutter, tech storage

A few months ago I worked very hard to get rid of the clutter on my counter tops. This involved de-cluttering the cabinets underneath, specifically de-cluttering the cabinet lazy susan which was on Billiam’s List, and was an all day process. As I surveyed the lovely results of my labor, my gaze ground to halt at the site of all the technocrap and cords that really could not go elsewhere. For several weeks this was a source of much grumbling every time I looked at it. With the Craig’s List finds, I did something about it. The technomess has been contained!

technomessThis was my technomess. Phone, weather radios, iPod, and the giant multi-plug.

technoshelfFirst I measured the space I would need to neatly and snugly corral the technology. I’d found a truck load of used and leftover lumber pieces and cabinet doors on Craig’s List just for such projects. I used 1 X 3 pine boards for the frame and shelf insert. The outer frame is connected with 1 inch stainless steel corner braces. The inner shelf is supported by trimmed scraps from the 1 X 3 inch boards which are glued in place with wood glue prior to painting the shelf. Because the shelf is not there to support anything heftier than an iPad and cell phone, I didn’t bother with wood screws. The glue is fine for this purpose. Once the glue was dry, I painted the entire unit.

technocabinetNot only did the shelving have to fit the technology I was trying to hide, it also had to fit one of the used cabinet doors I found on Craig’s List. I built it so that there is a slight lip on the sides and top for easy raising and lowering without hardware. The fellow I bought the used cabinet doors from, threw a 5 gallon paint bucket of hinges into the bargain. I’ll not need to buy hinges in the foreseeable future. Because the cabinet door had been poorly stained and fairly abused, it required sanding. I then covered it with a thin coat of the same Apple Butter paint color that is on the kitchen walls and let it dry. Next I painted on a thin layer of the green that I’d used on the shelving and let that dry. Once the paint was dry I sanded it so that some of the wood, some of the yellow and some of the green showed. After wiping off the dust from sanding, I brushed a coat of Minwax Espresso stain over the entire door and let it soak in for about 10 minutes before wiping it off.

This process of paint, rough sanding and stain is what gives the finished piece the weathered and aged look I am fond of, but you can easily just use a gloss paint or a polystain for whatever look you like. You could also use a nice wooden picture frame that you can attach small hinges to for the door and use a nice photo or painting to cover the clutter within. Once the finish had dried, I coated it with polyurethane so that it’s easy to wipe down with a damp rag. I do use that kitchen and I wanted to be able to clean mixer spatter off of that cabinet. I added the hinges on the bottom so that I can easily swing the door down to access the phone, radios and plug my mixer into the gigantoplug.  TaDA! Technomess containment has been achieved.

Share this:

  • Share on X (Opens in new window) X
  • Share on Facebook (Opens in new window) Facebook
Like Loading...
← Older posts
Newer posts →

Posts, stories, woes, vittles, photo and video evidence

Categories

Enter your email address to follow this blog and receive notifications of new posts by email.

Join 45 other subscribers

Current woes, tall tales, and lessons learned

  • Here are the mutts.
  • January Cure 2018- Flowers and Floors and Stuff
  • January Cure 2018 Day 2- Make a list
  • January Cure 2018- Day 1- Clear and Organize a Drawer
  • January Cure 2018: But first a word from our sponsor
  • January Cure Weekend 1- Flowers and Floor
  • Day 3 January Cure 2017- Purge the Pantry vs Cabinet Cleanout
  • Day 2 January Cure 2017- Making a List (humming- checking it twice)
  • January Cure 2017 Day 1
  • Billiam’s List Bedroom Tile: Pat us on the head!

Tags

cabinet cabinet doors chickens cleaning cleaning house cleaning stainless death of spouse desert gardening DIY diy chair do it yourself dreams of dead spouse easy bedspread easy cotton bedspread egg bound farm floors garden garden bed gardening grief hanging bed heirloom squash hens home cleaning home decor home furniture home improvement homemade furniture home organization horse house cleaning how to handle grief how to hide cord clutter how to make serving trays January Cure January Cure 2016 January Cure 2017 January Cure 2018 landscaping mayo arrote miniature horse no sew bedspread off road wheelchair organic gardening organizing ottoman outdoor furniture outoor furniture pallet patio patio chair patio furniture pumpkin serving trays squmpkin storage bench swinging bed TankChair tank chair tech storage tie-dye tie-dye bedspread to-do lists tools tracked wheelchair tree trimming upcyle cabinet door upholstery wood chair wood craft wood crafts wooden chair wood furniture yard

Blog at WordPress.com.

  • Subscribe Subscribed
    • Jean's Blog of Life, Farms and Everything
    • Join 45 other subscribers
    • Already have a WordPress.com account? Log in now.
    • Jean's Blog of Life, Farms and Everything
    • Subscribe Subscribed
    • Sign up
    • Log in
    • Report this content
    • View site in Reader
    • Manage subscriptions
    • Collapse this bar
 

Loading Comments...
 

    %d